# AgentRoof CRM
Capture, Nurture & Convert Leads with AgentRoof Real Estate CRM
# Onboarding
# How to Access AgentRoof CRM
Follow these steps to log in to your AgentRoof CRM account.
1. Open the CRM login page using one of the following methods:
- Click the **CRM Login** button at the bottom of your website, or
- Open your browser and visit **[https://crm.agentroof.com](https://crm.agentroof.com)**
2. Enter your email address in the email field.
3. Enter your password in the password field.
4. Click the **Login** button.
You will now be logged in and ready to manage your listings, leads, and clients using AgentRoof CRM.
# How to reset your AgentRoof CRM password?
If you have forgotten your password, follow these steps to create a new one.
#### Steps
1. Open the AgentRoof CRM login page.
2. Click the **Forgot Password** link.
3. You will be redirected to the password reset screen.
4. Enter your registered email address.
5. Click the **Submit** button.
> **Note:** If you do not remember your registered email address, please contact our support team for assistance.
6. Check your email inbox for a message with the subject **"Password Reset"** from **donotreply@crm.agentroof.com**.
7. If you do not see the email in your inbox, check your spam or junk folder.
8. Open the email and click the password reset link.
9. You will be redirected to the password reset page.
10. Enter your new password.
#### Password Requirements
Your password must:
- Be at least 8 characters long
- Include at least one uppercase letter
- Include at least one number
- Include at least one special character
11. Click the **Submit** button.
12. Once your password has been successfully updated, you will be redirected to the login page.
13. Log in using your new password.
You have successfully reset your password and can now continue using AgentRoof CRM.
# Integration
# Integrating Zapier
- AgentRoof Provides [WebHook](https://zapier.com/features/webhooks "https://zapier.com/features/webhooks") to connect your Zaps
- Using AgentRoof WebHook you can send data of leads from any application connected to [Zapier](https://zapier.com/ "https://zapier.com/") to AgentRoof CRM
- The WebHook Accept the following information
- Name
- Email
- Phone
- Campaign Name
- Adset Name
Find below the instructions to connect your Zaps to AgentRoof CRM
1. Create new Zap trigger Refer: [Set up your Zap trigger](https://help.zapier.com/hc/en-us/articles/8496288188429-Set-up-your-Zap-trigger#h_01J5TN82DP6CXGMFR93ME3H8F0)
1. Or you can use your existing Zap trigger
2. Create Action
1. Choose Action type as Webhook By Zapier
2. On the App & Event section
1. Choose Event as POST
[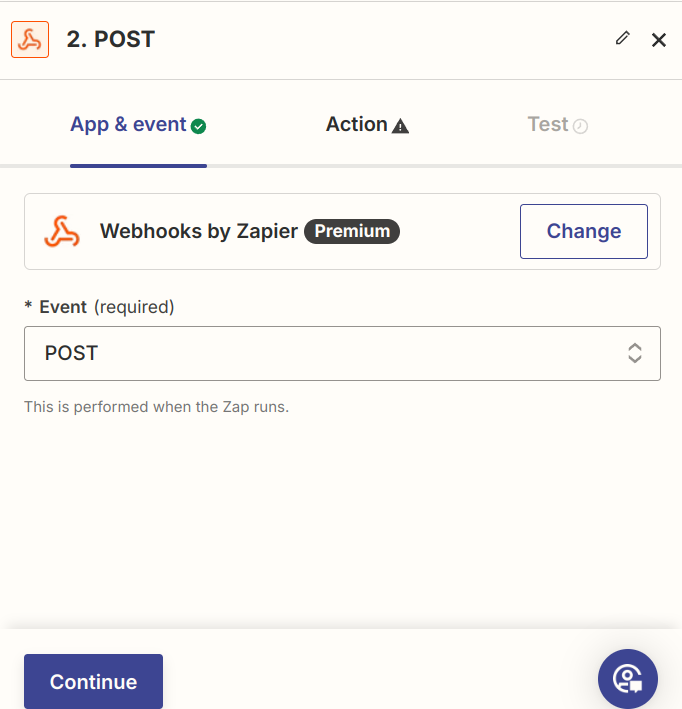](https://wiki.agentroof.com/uploads/images/gallery/2026-04/screenshot-from-2024-08-28-00-04-10.png)
2. Click Continue
3. In the action section enter the following details
1. URL
1. https://crm.agentroof.com/api/facebook-lead-via-zapier
2. Payload type
1. Form
3. Data
1. In this section add the following data using the '+' button
2. name
1. Choose name filed from your trigger
2. This is a required field
3. email
1. Choose email field from your trigger
2. Either email or phone is required
4. phone
1. Choose phone field from your trigger
2. Either email or phone is required
5. campaign
1. You can input any value or choose from your trigger
2. This is used to identify the source of the lead in CRM
3. This field is required
6. adname
1. This field is optional
2. It Can be used when you are running facebook add
4. Wrap Request In Array
1. Choose ‘No’
5. Unflatten
1. Choose ‘Yes’
6. Headers
1. Set header name as ‘APPKEY’
2. Value as
1. Your CRM KEY
1. Get the key from our support team
7. Click Continue
4. Test your step and verify you have received a lead in CRM
5. Publish the Zap
# Integrating Third-party Landing Pages Via API
#### Overview
AgentRoof CRM provides an API to integrate lead submissions from external websites or landing pages not developed by AgentRoof. This API allows users to send lead details directly to AgentRoof CRM.
#### Base URL
`https://crm.v2.1.agentroof.com/api/add-lead`
#### Request Method
- **POST**: The API accepts POST requests to submit lead information.
#### Request Headers
The request headers must include the `APPKEY`, which serves as your CRM authentication key. Contact the AgentRoof support team to obtain your unique `APPKEY` (CRM Key).
#### Example Header:
`APPKEY: your-crm-appkey-here`
#### Request Body
The request body should be sent as `form-data` and include the following fields:
Field Name
Type
Required
Description
`name`
string
Yes
The full name of the lead.
`email`
string
Yes
The lead's email address (must be a valid email).
`phone`
string
Yes
The lead's phone number (must be a 10-digit number).
`url`
string
Yes
The URL of the website or landing page from which the form is submitted.
`source`
string
No
The lead source (default: `website`). Can be customized.
`stage`
string
No
The lead's stage (default: `Lead`).
`tag`
string
No
Tags associated with the lead (default: `Buyer lead, Seller lead`).
#### Example Request Body:
`name: John Doeemail: john.doe@example.comphone: 1234567890url: source: Facebookstage: New Leadtag: Seller lead`
#### Response
The API will return a JSON response indicating the success or failure of the lead submission.
#### Successful Response:
#### Error Response:
If the request fails due to missing required fields or validation errors, the API will return a JSON response with details:
`{"status":"error","message":"The email must be a valid email address.,The phone field is required."}`
#### Whitelisting IP Address
To ensure the API requests are not blocked by AgentRoof's firewall, you are required to share the IP address from which the requests will be made. Contact AgentRoof support to have your IP address whitelisted.
#### Important Notes
- **APPKEY**: Always ensure the correct APPKEY is used in the request header.
- **IP Address Whitelisting**: Failure to whitelist your IP address may result in the API request being blocked by AgentRoof's firewall.
- **Form-Data Submission**: Ensure that all required fields are provided in the correct format to avoid validation errors.
For any additional assistance, please contact the AgentRoof support team.
# Integrate Facebook Lead Ads
#### What is Facebook Lead Ads Integration?
Facebook Lead Ads Integration allows you to connect your Facebook Lead Center directly to AgentRoof CRM.
Once connected, leads submitted through your Facebook Lead Ads are automatically captured and added to AgentRoof CRM, helping you respond to new inquiries more quickly and efficiently.
---
#### Access the Integration Page
1. Navigate to the left-hand menu.
2. Click **Integration**.
The Integration page will be displayed.
---
##### Connect Facebook Lead Ads
1. Locate the **Facebook Lead Ads** integration.
2. Click **Connect Now**.
You will be redirected to the Facebook Lead Ads configuration page.
---
##### Configure the Integration
1. Click **Connect Facebook**.
##### Import Existing Facebook Leads
If you would like to import leads that already exist in your Facebook Lead Center:
1. Select **Yes**.
If you only want to receive new leads going forward:
1. Select **No**.
2. Click **Continue**.
You will be redirected to the Facebook login page.
---
#### Log in to Facebook
1. Enter your Facebook credentials.
2. Complete the login process.
After successfully logging in, a list of Facebook Pages associated with your account will be displayed.
---
##### Select Facebook Pages
1. Select the Facebook Page or Pages you want to connect to AgentRoof CRM.
2. Click **Next**.
The permissions page will be displayed.
---
##### Grant Required Permissions
To allow AgentRoof CRM to automatically receive leads submitted through Facebook Lead Ads:
1. Review the requested permissions.
2. Select **Yes** for all permissions.
3. Click **Done**.
> **Note**
>
> The requested permissions are required for AgentRoof CRM to retrieve leads from your Facebook Lead Center automatically.
---
##### Complete the Integration
1. Click **OK** on the confirmation screen.
Your Facebook Lead Center is now successfully connected to AgentRoof CRM.
---
#### Activate Connected Pages
After the connection is completed:
1. Return to the Facebook Lead Ads configuration page.
2. Locate the connected Facebook Pages.
3. Click **Activate** next to each page you want to receive leads from.
Once activated, leads submitted through those Facebook Lead Ads will automatically be added to AgentRoof CRM.
---
#### Manage Connected Pages
At any time, you can:
- Add additional Facebook Pages
- Remove connected Facebook Pages
- Activate or deactivate lead synchronization
- Disconnect the Facebook integration entirely
All management options are available from the Facebook Lead Ads configuration page.
---
#### Conclusion
You have successfully learned how to connect Facebook Lead Ads to AgentRoof CRM, import existing Facebook leads, activate connected pages, and manage your Facebook Lead Ads integration.
# Integrate Twilio SMS
# Email Marketing Guide
# Email Warmup & Deliverability Guide
When you create a new email address and start sending bulk emails right away, Gmail, Outlook, and other email providers get suspicious. They have never seen your email address before and don't know if you are a real business or a spammer. This guide helps you build a good sending reputation so your emails land in the inbox.
> **Note:** Building a good email reputation takes 4 to 6 weeks. Don't rush it. The patience you invest in the beginning will pay off with much better results once you scale up.
---
## Part 1 — Warm Up Your Email First
Think of it like a new phone number. If you call 500 strangers on Day 1, everyone blocks you. But if you start with a few trusted contacts and slowly expand, people recognise you as legitimate.
**Never send hundreds of emails on your very first day.**
### Recommended Warmup Schedule
Period
Daily Volume
Who to Send To
Week 1
20 – 50 emails
People who know you — existing clients, colleagues, contacts expecting your email
Week 2
100 – 200 emails
Contacts who are likely to open your emails
Week 3
Up to 500 emails
Only if Week 2 performed well — see healthy metrics below
Week 4
1,000 – 2,000 emails
Broader audience as reputation grows
Week 5+
Scale gradually
Based on performance and list size
### What Does a Healthy Warmup Look Like?
Check your AgentRoof CRM dashboard after every send. You want to see:
- More than **20% of people opening** your emails
- **Spam complaint rate below 0.1%** — less than 1 complaint per 1,000 emails sent
- **Bounce rate below 2%** — very few emails being rejected
If people are marking your emails as spam, slow down and fix your content before sending more.
---
## Part 2 — Start With Plain Text Emails
When your email address is brand new, plain text emails are your best friend. No images, no fancy colours, no big banners — just simple text like you would write to a friend or colleague.
**Why plain text works better initially:**
- Spam filters trust plain text more than heavily designed emails
- It looks personal rather than like a mass blast
- Less chance of rendering issues on different email apps
Once you have been sending for 3 to 4 weeks and your open rates are healthy, you can gradually start using designed templates with images and branding.
---
## Part 3 — Your Contact List Is Everything
This is the most important factor in whether your emails reach the inbox. A small clean list outperforms a large dirty one every single time.
**Only email people who gave you their contact details.** If someone didn't share their email with you directly, don't email them. Purchased lists or scraped lists will get your domain blacklisted very quickly.
**Remove wrong or old email addresses.** If an email bounces (gets rejected), remove that contact immediately. Too many bounces signal to providers that you are not maintaining your list.
**Remove people who never open your emails.** If someone hasn't opened any of your last several emails over a couple of months, stop emailing them. Sending to people who ignore you signals to Gmail that your emails are unwanted.
**Respect unsubscribes immediately.** If someone asks to be removed, remove them before your next send. AgentRoof CRM handles unsubscribe links automatically — make sure you are using them.
---
## Part 4 — Writing Emails That Don't Land in Spam
### Subject Line Tips
- Be honest and clear — the subject should describe what's inside
- Don't write in ALL CAPS
- Avoid trigger words: *Free, Winner, Guaranteed, Act Now, Limited Time, Earn Money, No Risk, Click Here*
- Don't use excessive exclamation marks like **!!!**
❌ Avoid This
✅ Use This Instead
AMAZING OFFER JUST FOR YOU!!!
Following up on your property inquiry
FREE leads — ACT NOW, Limited Time!!!
3 new listings in your area this week
GUARANTEED results — Click here NOW
Hi Rahul, your market report is ready
### Email Body Tips
- Write like a normal human being — short, clear, and to the point
- Don't use link shorteners like bit.ly — use your actual website link
- Make sure every link you include actually works
- Don't use very small or invisible text anywhere in the email
- Include your company name and contact details at the bottom of every email
### What to Avoid
- Don't attach files to bulk emails — attachments get flagged as spam
- Don't send an email that is just one big image with barely any text — write actual sentences
- Don't copy-paste content directly from Word documents — it brings hidden formatting that triggers spam filters
---
## Part 5 — How You Send Matters Too
**Send on a regular schedule.** Sending 2,000 emails one day, then nothing for two weeks, then 2,000 again looks suspicious. Try to send consistently — for example, every Tuesday morning rather than randomly.
**Send relevant content.** If you have a list of people interested in rentals and another interested in buying, send them different emails. People engage more with relevant content, and high engagement helps your reputation.
**Check your results after every campaign.** In AgentRoof CRM, look at who opened your email, who clicked, who bounced, and who unsubscribed. These numbers tell you whether you are on the right track.
---
## Part 6 — My Emails Are Going to Spam — What Do I Do?
Go through this checklist one by one:
1. Are you sending too many emails too fast? **Slow down** and follow the warmup schedule.
2. Is your contact list clean? **Remove bounced and unengaged contacts.**
3. Does your subject line sound spammy? **Rewrite it** using the tips in Part 4.
4. Are you emailing people who never asked to hear from you? **Stop and clean your list.**
5. Are you getting a lot of spam complaints? Your **content or your list** is the problem.
If the problem continues, contact AgentRoof support and we will help you investigate.
---
## Quick Reference Summary
What to Do
Why It Matters
Start with 20–50 emails per day
Builds trust with email providers gradually
Begin with plain text emails
More trusted by spam filters initially
Only email people who know you
Keeps spam complaints low
Clean your list regularly
Keeps bounce rate low
Write honest, simple subject lines
Gets emails opened, not flagged
Send on a consistent schedule
Looks like a legitimate sender
Check your stats after every send
Catch problems before they get serious
# Lead Management
# How to Create a Lead in AgentRoof CRM
Follow these steps to add a new lead to AgentRoof CRM.
#### Steps
1. Log in to AgentRoof CRM using your assigned credentials.
2. From the left-hand navigation menu, click **CRM**.
3. On the CRM page, click the + button located in the Leads row to create a new lead.
4. In the pop-up window, enter the lead's **Full Name**.
5. Provide atleast one contact method for the lead by entering a **Phone Number**, an **Email Address**, or both.
6. Select the appropriate **Lead Source** from the available options.
7. If the required source is not available, click the **+** button next to the Source field and create a new source.
8. Click **Save** to create the lead.
#### Result
The newly created lead will be displayed on the CRM page and is ready for follow-up and management.
You have successfully created a lead in AgentRoof CRM.
# How to Import Multiple Leads into AgentRoof CRM
Follow these steps to import multiple leads into AgentRoof CRM using a CSV file.
#### Steps
1. Log in to AgentRoof CRM.
2. From the left-hand menu, click **CRM**.
3. Locate the yellow box icon in the Leads row and click **Import**.
4. Under **Select From**, choose the appropriate import option:
- Direct Import
- Facebook Import
5. Click the blue **Given Format** link to download the sample CSV file for the selected import type.
6. Open the downloaded CSV file.
7. Enter the lead information in the corresponding columns.
#### Direct Import Fields
For Direct Import, complete the following fields:
- Name
- Phone Number
- Email ID
- Tags
- Source
- Stage
- Notes
#### Field Requirements
- Each lead must have a valid name.
- Provide at least one contact method: a phone number, an email address, or both.
- Phone numbers must be valid 10-digit numbers without country codes or brackets.
- To add multiple phone numbers, separate them using a comma and a space. The first phone number will be used as the primary phone number.
- Email addresses must be entered in a valid format.
- To add multiple email addresses, separate them using a comma and a space. The first email address will be used as the primary email address.
- To assign multiple tags, enter them as comma-separated values.
- If no tag is provided, no tag will be assigned during import.
- If the Stage field is left blank, the lead will be assigned the default stage **Lead**.
- If the Source field is left blank, the lead will be assigned the default source **Import**.
#### Facebook Import Fields
For Facebook Import, the CSV file must contain the following columns:
- id
- created\_time
- ad\_id
- ad\_name
- adset\_id
- adset\_name
- campaign\_id
- campaign\_name
- form\_id
- form\_name
- is\_organic
- platform
- full\_name
- phone\_number
- email
8. Save the completed CSV file.
9. Return to AgentRoof CRM and upload the file.
10. Submit the import request.
#### Result
The import process will run in the background. A confirmation message will be displayed when the file is successfully added to the queue.
Once the import process is complete, an email notification will be sent to your registered email address indicating the import status.
- Successful imports will display the number of leads imported.
- Failed imports will include the corresponding error details.
You can view the imported leads from the Leads section in AgentRoof CRM.
You have successfully imported multiple leads into AgentRoof CRM.
# How to Delete a lead in AgentRoof CRM?
#### What Happens When a Lead Is Deleted?
Deleting a lead removes the lead from the active CRM records and makes it no longer visible on the CRM page.
AgentRoof CRM uses a soft-delete process. If the same lead is recreated using the exact same primary contact information, such as the same email address or phone number, previously associated information—including notes, action plans, and email history—can be restored.
---
#### Method 1: Delete a Lead from the CRM Page
**Steps**
1. Navigate to **CRM**.
2. Select the checkbox next to the lead you want to delete.
3. Go to the more option
4. Click the **Delete** button.
5. Review the confirmation message.
6. Click **Yes** to confirm the deletion.
The selected lead will be deleted successfully.
---
#### Method 2: Delete a Lead from the Lead Profile Page
You can also delete a lead directly from its profile page.
**Steps**
1. Navigate to **CRM**.
2. Open the desired lead record.
3. Click the **Profile** tab.
4. Scroll down and click **Delete Lead**.
5. Review the confirmation message.
6. Click **Yes** to confirm the deletion.
The selected lead will be deleted successfully.
> **Note**
>
> Deleting a lead does not permanently erase all associated information from the system. AgentRoof CRM uses a soft-delete mechanism to preserve historical data for future restoration if the same lead is recreated.
---
#### Conclusion
You have successfully learned how to delete leads from the CRM page and the Lead Profile page in AgentRoof CRM.
# How to Search A lead?
The lead search feature allows you to quickly locate leads in AgentRoof CRM using a lead's name, phone number, or email address.
The search function supports partial matching. For example, if a lead's name is **Emma Taylor**, searching for **mma** will still return the matching lead. Similarly, you can search using a portion of an email address, phone number, or name, and the CRM will display relevant results.
#### Steps
1. Navigate to the CRM page.
2. Locate the search box on the top-left side of the listing page, directly below the **Leads** title.
3. Enter the lead's name, phone number, email address, or a portion of any of these values.
4. The CRM will automatically filter and display matching leads.
#### Result
The CRM will display all leads that match the search criteria, making it easier to locate and manage specific lead records.
# How to Export the Leads?
Exporting leads allows you to download lead information from AgentRoof CRM into a CSV file for reporting, backup, analysis, or migration purposes.
The exported file can contain lead details such as names, phone numbers, email addresses, sources, tags, stages, and notes.
#### Exporting Selected Leads
1. Navigate to the **CRM** page.
2. Select the checkbox next to the leads you want to export. Alternatively, you can use filters such as Tags, Sources, Stages, or other available criteria to narrow down the leads you want to export.
3. Click the **More** option.
4. Under the more option click the **Export Leads** button.
5. An OTP will be sent to your registered email address and the phone number.
6. Enter the OTP to verify the export request.
7. Once verification is complete, the export process will begin automatically.
#### Exporting All Leads
1. Navigate to the **CRM** page.
2. Select the **Select All** checkbox.
3. Click the **More** option.
4. Under the more option click the **Export Leads** button.
5. An OTP will be sent to your registered email address and the phone number.
6. Enter the OTP to verify the export request.
7. Once verification is complete, the export process will begin automatically.
> **Note:** The OTP is valid for 10 minutes.
#### Export File Details
The exported file will be downloaded in CSV format.
The CSV file may contain the following lead information:
- Name
- Phone Numbers
- Email Addresses
- Source
- Tags
- Stage
- Notes
#### Result
The selected leads will be exported successfully and downloaded as a CSV file, allowing you to view, store, or manage lead information outside of AgentRoof CRM.
# How to select lead?
Selecting leads allows you to perform actions on one or more leads at the same time. Once selected, leads can be used for various CRM operations such as assigning tags, stages, alerts, action plans, exporting data, and other bulk actions.
#### Steps
1. Navigate to the **CRM** page.
2. To select all leads currently displayed on the page, click the **Select All** checkbox located in the left-most column of the Leads row.
3. To select specific leads, click the checkbox next to each lead you want to select.
4. To view all selected leads, click **Selected Leads** located in the Leads row.
5. A pop-up window will appear displaying the list of currently selected leads.
6. To remove an individual lead from the selection, click the **X** icon next to that lead.
7. To remove all selected leads at once, click **Clear All**.
#### Result
The selected leads will remain available for bulk actions until they are removed individually or cleared from the selection list.
# How to Filter all Leads?
Lead filtering helps you quickly narrow down your lead list and focus on specific groups of leads. This makes it easier to find relevant records, monitor lead activity, and perform targeted follow-ups without manually searching through all leads.
#### Steps
1. Navigate to the **CRM** page.
##### Filter by Recent Activity
1. Locate the **Recent Active** filter on the CRM page.
2. Click the filter to view recently active leads.
3. You can also filter leads based on activity from the last seven days.
##### Filter by Email Status
1. In the **Email** column, click the filter icon.
2. Select one of the available options:
- Good
- Bad
- Empty
- All
The CRM will display leads matching the selected email status.
##### Filter by Phone Status
1. In the **Phone** column, click the filter icon.
2. Select one of the available options:
- Good
- Bad
- Empty
- All
The CRM will display leads matching the selected phone status.
##### Filter by Created Date
1. In the **Created Date** column, click the filter icon.
2. Select a predefined date range or specify a custom date range.
3. Apply the filter.
The CRM will display leads created within the selected date range.
##### Filter by Tags
1. In the **Tags** column, click the filter icon.
2. Select one or more tags.
3. Apply the filter.
The CRM will display leads assigned to the selected tags.
##### Filter by Stage
1. In the **Stage** column, click the filter icon.
2. Select one or more stages.
3. Apply the filter.
The CRM will display leads assigned to the selected stages.
##### Filter by Source
1. In the **Source** column, click the filter icon.
2. Select one or more sources.
3. Apply the filter.
The CRM will display leads associated with the selected sources.
> **Note:** When filtering by source, the CRM includes leads that currently have the selected source as well as leads that have had the selected source at any point in their source history.
#### Result
The CRM will display only the leads that match the selected filter criteria, making it easier to locate, organize, and manage specific groups of leads.
# How to Customize CRM Page Columns
The CRM page displays a set of default columns to help you view and manage lead information. You can customize these columns to display only the information that is most relevant to your workflow and rearrange their order to make the CRM page easier to navigate and manage.
There are two ways to customize CRM page columns in AgentRoof CRM.
#### Method 1: Show or Hide Columns
**Steps**
1. Navigate to the CRM page.
2. Click the **Settings** icon located on the CRM page.
3. A list of available columns will be displayed.
4. Select or deselect the columns you want to display on the CRM page.
5. The CRM page will update to reflect your selected column preferences.
#### Method 2: Reorder Columns
**Steps**
1. Navigate to the CRM page.
2. Locate the column you want to reposition.
3. Click and drag the selected column to your desired location.
4. Release the column to place it in its new position.
5. The CRM page will automatically update the column order.
> **Note**
>
> - The first column is fixed and cannot be reordered.
> - Displaying too many columns may impact the loading speed of the CRM page.
> - Any changes made to the column arrangement will be reflected immediately on the CRM page.
#### Result
The CRM page will display only the selected columns and their updated order, allowing you to customize the lead view according to your business needs and preferences.
# How to assign Tags to Leads?
Tags help organize leads based on shared characteristics and make it easier to perform bulk actions, automate communications, and manage lead groups within AgentRoof CRM.
#### Method 1: Assign Tags from the Leads Listing Page
**Steps**
1. Navigate to the CRM page.
2. Select the checkbox next to the lead you want to assign a tag to.
3. Click the **Assign Tag** icon located in the Leads row.
4. A pop-up window will appear displaying all available tags.
5. Select the tag(s) you want to assign to the lead.
6. Click **Apply** or confirm the selection.
#### Method 2: Assign Tags from the Lead Profile Page
**Steps**
1. Select the desired lead.
2. Click the **Profile** button to open the lead profile page.
3. Locate the **Tags** section and click the **+** button beside it.
4. Select the checkbox for the tag(s) you want to assign. You can select multiple tags if needed.
5. Click **Apply** to confirm your changes.
> **Note:** When a lead is assigned to a tag, any active items associated with that tag—such as Action Plans, New Listing Alerts, Market Updates, Newsletters, or other tag-based automations—may also be applied to the lead, depending on the tag configuration.
#### Result
The selected lead will be assigned to the chosen tag and will become part of any workflows, communications, or automations associated with that tag.
# How to assign Stages to a Lead?
Stages help organize leads based on their current position in the sales process, making it easier to track progress and manage lead pipelines within AgentRoof CRM.
#### Method 1: Assign Stages from the Leads Listing Page
**Steps**
1. Navigate to the CRM page.
2. Select the checkbox next to the lead you want to assign a stage to.
3. Click the **Assign Stage** icon located in the Leads row.
4. A pop-up window will appear displaying all available stages.
5. Select the stage you want to assign to the lead.
6. Click **Apply** or confirm the selection.
#### Method 2: Assign Stages from the Lead Profile Page
**Steps**
1. Select the desired lead.
2. Click the **Profile** button to open the lead profile page.
3. Locate the **Stage** section and click the current stage name.
4. Select the stage you want to assign to the lead.
5. The selected stage will be updated successfully.
> **Note:**
>
> - A lead can only have one stage at a time. To change a lead's stage, click the current stage name and select a new stage.
> - When a lead is assigned to a stage, any active items associated with that stage—such as Action Plans, Listing Alerts, Price Drop Alerts, Market Updates, Newsletters, or other stage-based automations—may also be applied to the lead, depending on the stage configuration.
#### Result
The selected lead will be assigned to the chosen stage and may automatically inherit any workflows, alerts, communications, or automations associated with that stage.
# How to merge two leads in AgentRoof CRM?
Lead merging allows you to consolidate duplicate or similar lead records into a single lead profile. This is useful when multiple lead records contain overlapping information and you want to maintain a cleaner and more organized CRM database.
#### Steps
1. Navigate to the **CRM** page.
2. Select the checkboxes next to the leads you want to merge.
- Minimum selection: 2 leads
- Maximum selection: 10 leads
3. Click the **More** option.
4. Click the **Merge Leads** button
5. A pop-up window will appear displaying the selected leads.
6. Select the **Primary Lead** that you want to retain after the merge.
7. Review the merge details and confirm the action.
8. Click **Merge Leads**.
The selected leads will be merged successfully.
> **Note:** Transferred leads cannot be merged and will be excluded from the merge selection.
#### What Happens During a Merge?
When leads are merged:
- The selected Primary Lead will be retained.
- Contact information and associated activities from the other selected leads will be transferred to the Primary Lead.
- The remaining lead records will be removed from the CRM.
The following items associated with the merged leads will be permanently discarded:
- Action Plans
- Alerts
- Stages
- Tags
- Sources
- Tasks
- Appointments
- Newsletters
- Market Updates
- Scheduled Items
> **Important:** Lead merging is a permanent action and cannot be undone.
#### Result
The selected leads will be consolidated into the chosen Primary Lead, helping maintain a cleaner CRM database while preserving contact information and associated activities under a single lead record.
# AgentRoof CRM Settings
# Manage Tags
Tags help organize leads and make it easier to perform bulk actions on groups of leads.
#### What Are Tags?
A tag is used to group leads based on a common category or characteristic. Tags can be used to filter leads and perform bulk operations.
- A lead can have multiple tags.
- A tag can be assigned to multiple leads.
> **Note:** System tags created by AgentRoof cannot be edited or deleted.
---
#### View Leads Assigned to a Tag
1. Navigate to **Settings** from the left-hand menu.
2. Click **Tags**.
3. Locate the tag you want to view.
4. Click the number displayed in the **Leads** column.
The list of leads assigned to the selected tag will be displayed.
#### Remove a Tag from Assigned Leads
1. Select the checkbox next to the desired leads, or use **Select All**.
2. Click **Remove Tag**.
The selected tag will be removed from the chosen leads.
---
#### Create a New Tag
1. Navigate to **Settings** > **Tags**.
2. Click **+ Add New** at the top of the page.
3. Enter the tag name.
4. Click **Add Tag**.
The new tag will be created successfully.
---
#### Edit a Tag
> **Note:** System tags cannot be edited.
1. Navigate to **Settings** > **Tags**.
2. Locate the tag you want to edit.
3. Click **Edit** in the **Actions** column.
4. Update the tag name as needed.
5. Click **Update Tag**.
The tag will be updated successfully.
---
#### Delete a Tag
> **Notes:**
>
> - System tags created by AgentRoof cannot be deleted.
> - When a tag is deleted, it will be removed from all assigned leads, action plans, listing alerts, newsletters, and market updates.
> - Action plans assigned through the tag will be paused.
> - Listing alerts, newsletters, and market updates assigned through the tag will be removed.
#### Steps
1. Navigate to **Settings** > **Tags**.
2. Locate the tag you want to delete.
3. Click **Delete** in the **Actions** column.
4. Review the warning message.
5. Click **Confirm Delete**.
The tag will be deleted successfully.
---
#### Merge Tags
> **Notes:**
>
> - Certain system-managed tags cannot be merged. These include **Bounced**, **Do Not Disturb**, **Spam Reported**, **Stop SMS**, and **Unsubscribed**.
> - A minimum of 2 and a maximum of 10 tags can be merged at a time
> - When custom tags are merged, all non-main tags are deleted after the merge, and their associated leads are moved to the selected Main Tag.
> - System-managed tags behave differently. If a system tag is included in a merge and is **not selected as the Main Tag**, it will **not be deleted** after the merge. The tag will remain in the system to preserve communication preferences and compliance settings.
#### Steps
1. Navigate to **Settings** > **Tags**.
2. Select the checkboxes next to the tags you want to merge.
3. Click **Merge** from the top menu.
4. In the popup window, select the **Main Tag**.
5. Review the merge details.
6. Click **Merge Tags** to complete the process.
The selected tags will be merged successfully.
When tags are merged:
- The selected tags will be removed from all associated leads.
- The Main Tag will be assigned to all leads belonging to the merged tags if it is not already assigned.
Optional: Move Associated Items
You can choose to move the following items from the selected tags to the Main Tag:
- Action Plans
- Listing Alerts
- Newsletters
- Market Updates
When this option is selected, these items will be assigned to leads under the Main Tag if they are not already assigned.
# Managing Stages in AgentRoof CRM
#### What Are Stages?
Stages help organize leads based on their current position in the sales process. Examples of stages include **Lead**, **Active Buyer**, **Active Seller**, and other custom stages that match your workflow.
> **Note:** A lead can be assigned to only one stage at a time, while a single stage can contain multiple leads.
#### Why Are Stages Important?
Stages provide a structured way to track lead progress and manage your sales pipeline. By using stages, you can:
- Monitor where leads are in the sales process.
- Organize leads based on their current status.
- Filter and manage leads more efficiently.
- Apply stage-specific automations and communications.
- Gain better visibility into your pipeline.
> **Note:** System default stages created by AgentRoof cannot be edited or deleted.
#### Viewing Leads by Stage
1. Navigate to **Settings**, and then select **Stages**.
2. All available stages will be displayed on the Stages page.
3. If needed, use the **Search Stage** field to quickly find a specific stage.
4. Click the number displayed in the **Leads** column.
The list of leads assigned to the selected stage will be displayed.
#### Creating a New Stage
1. Navigate to **Settings > Stages**.
2. Click the **+** icon or **Add New** button.
3. Enter the stage name.
4. Click **Add Stage**.
The new stage will be created successfully.
#### Merging Stages
> **Notes:**
>
> - When a custom stage is merged, the custom stage is deleted after its leads are moved to the selected stage. AgentRoof default stages cannot be deleted and will remain available after the merge.
> - A minimum of 2 and a maximum of 10 stages can be merged at a time.
##### Steps
1. Select the checkboxes next to the stages you want to merge.
2. Click **Merge Stages** from the top menu.
3. In the pop-up window, select the **Main Stage**.
4. Review the merging details.
5. Click **Merge Stages** to complete the process.
The selected stages will be merged successfully, and all associated leads and optional stage-related assignments will be consolidated under the Main Stage.
**What Happens During a Stage Merge?**
When stages are merged:
- The selected stages are removed from all associated leads.
- The Main Stage is assigned to all leads belonging to the selected stages if it is not already assigned.
- The selected stages are removed after the merge is completed.
**Moving Associated Items**
You can optionally move the following items from the selected stages to the Main Stage:
- Action Plans
- Listing Alerts
- Newsletters
- Market Updates
When this option is selected:
- Action Plans, Listing Alerts, Newsletters, and Market Updates from the selected stages will be assigned to leads under the Main Stage if they are not already assigned.
# Manage Source
Sources help identify where your leads originate from, such as website inquiries, direct imports, Facebook campaigns, referrals, and other lead generation channels.
Sources are automatically created when a lead is added with a source name that does not already exist in the system.
#### View Sources
1. Log in to AgentRoof CRM.
2. From the left-hand menu, click **Settings**.
3. Select **Sources**.
The Sources page displays all available lead sources.
#### View Leads Assigned to a Source
1. Locate the desired source.
2. Click the number displayed in the **Leads** column.
A list of leads assigned to the selected source will be displayed.
You can review all leads currently associated with the selected source.
---
#### Create a New Source
1. Navigate to **Settings** > **Sources**.
2. Click **+ Add New** at the top of the page.
3. Enter the source name.
4. Click **Add Source**.
The source will be created successfully and will be available for lead assignment.
---
#### Edit a Source
> **Note:** System sources cannot be edited.
1. Navigate to **Settings** > **Sources**.
2. Locate the source you want to edit.
3. Click **Edit** in the Actions column.
4. Update the source name.
5. Click **Update Source**.
The source will be updated successfully.
---
#### Merge Sources
Merging sources allows you to consolidate multiple lead sources into a single source.
#### Steps
1. Navigate to **Settings** > **Sources**.
2. Select the sources you want to merge.
3. Click **Merge** from the top menu.
4. Select the **Main Source**.
5. Click **Merge Sources** to complete the process.
The selected sources have been merged successfully.
When sources are merged:
- The selected sources will be removed from all associated leads.
- The Main Source will be assigned to all leads belonging to the merged sources if it is not already assigned.
Optional: Move Associated Items
You may select the option:
**Move Action Plans, Listing Alerts, Newsletters, and Market Updates from selected Sources to Main Source**
When enabled:
- Action plans, listing alerts, newsletters, and market updates from the selected sources will be assigned to leads under the Main Source if they are not already assigned.
#### System Source Behavior
If a system source is included in the merge:
- The system source itself will not be deleted.
- Leads assigned to the system source will be reassigned to the selected Main Source.
You have successfully learned how to manage sources in AgentRoof CRM.
# How to merge Leads Under Same Tag
Tag merging logic and constrains
# Managing Signatures in AgentRoof CRM
#### What Are Signatures?
Email signatures are predefined blocks of content that are automatically added to the end of emails sent from AgentRoof CRM.
A signature can contain text, images, contact information, social media links, company branding, and other professional details.
Common examples include:
- Thank you and regards messages
- Agent name and designation
- Contact information
- Company logo
- Social media links
- Custom branded email footers
#### Why Are Signatures Important?
Signatures help maintain a professional and consistent appearance across all outgoing communications. They can be used in manually sent emails as well as automated email campaigns.
By using signatures, you can:
- Present a professional brand image.
- Provide contact information to recipients.
- Maintain consistency across communications.
- Include company logos and branding.
- Save time by automatically appending information to emails.
#### Accessing the Signatures Page
1. Navigate to the menu bar and click **Settings**.
2. Select **Signatures**.
The Signatures page will display all available signatures in your CRM.
##### Creating a Signature
1. Open the **Signatures** page.
2. Use the editor workspace to create your signature.
3. Customize the content using the available formatting options, including:
- Text alignment
- Font styles
- Font size
- Text color
- Lists and formatting tools
4. Enter the desired signature content.
You can also switch to the HTML editor and create a signature using custom HTML code.
5. Click **Save Signature**.
The signature will be created successfully.
##### Creating Multiple Signatures
1. Click the **+** icon located in the Signatures row.
2. Enter a name for the signature.
3. If you want the signature to be used by default, enable the **Default** toggle.
4. Enter the signature content in the editor workspace.
5. Scroll down and click **Add Signature**.
The new signature will be created and added to the list of available signatures.
##### Setting a Default Signature
1. Locate the signature you want to use as the default.
2. Enable the **Default** toggle for that signature.
3. Save the changes if required.
The selected signature will be used as the default signature for emails.
##### Adding an Image to a Signature
1. Open the signature editor.
2. Click the **Insert/Edit Image** icon in the editor toolbar.
3. If you have the image URL, paste it into the source field.
4. Enter the desired image width and height.
5. Click **Save**.
Alternatively:
1. Select the **Upload** option.
2. Drag and drop the image or click **Browse** to select an image from your device.
3. Upload the image.
4. Click **Save**.
The image will be added to the signature.
#### Need a Custom Signature?
If you would like a professionally designed signature that matches your branding, contact the AgentRoof Support Team for assistance.
Your signatures are now available for use in emails sent from AgentRoof CRM, including automated email communications and campaigns.
# Listing Settings
Will do later
# Billing Portal
#### What is Billing Portal?
The Billing Portal page will display your billing information, payment methods, invoices, and subscription-related details.
#### How to Access the Billing Portal
1. Navigate to **Settings > Billing Portal** from the left-hand menu.
2. A new window will open automatically.
---
#### How to View Payment History
1. Scroll down to the **Invoice History** section.
All previous invoices and payment records will be displayed.
---
#### How to Change Your Payment Card
1. Navigate to the **Payment Methods** section.
2. Click **Add Payment Method**.
3. Enter the required card information.
4. Save the payment method.
The new card will be added successfully.
---
#### How to Set a Card as the Default Payment Method
1. Locate the card you want to set as the default payment method.
2. Click the three-dot menu located on the right side of the card.
3. Select **Make Default**.
The selected card will be used as the default payment method for future charges.
---
#### How to Download an Invoice
1. Scroll down to the **Invoice History** section.
2. Locate the invoice you want to download.
3. Click **Download Invoice**.
The invoice will be downloaded to your device.
---
#### How to Update Your Billing Information
1. Click **Update Information** under the **Billing Information**.
2. Enter or modify the required billing details.
3. Click **Save**.
The billing information will be updated successfully.
---
#### Important Information
> **Note:** AgentRoof does not store your card details. All payment methods are securely managed through the Stripe Billing Portal.
> AgentRoof may create invoices for subscription charges and additional services. These invoices can be automatically charged to your default payment method through Stripe.
# How to Contact AgentRoof Support
AgentRoof Support can be contacted through multiple channels depending on your preference and the type of assistance required.
#### Contacting Support by Phone, WhatsApp, or Email
You can contact AgentRoof Support directly using:
- Phone
- WhatsApp
- Email
These contact methods are available for general inquiries, technical assistance, and account-related questions.
##### Contacting Support Through the CRM
1. Log in to AgentRoof CRM.
2. From the left-hand navigation menu, click **Contact Us**.
3. The Contact Us page will be displayed.
You can either contact support directly using the email address provided on the page or submit a support request using the help form.
**Submitting a Support Request**
1. Select what you need help with:
- Website
- Subscription
- CRM
2. Enter your question, comment, or issue in the message field.
3. If required, attach a supporting file, document, or screenshot.
Supported file formats include:
- JPG
- JPEG
- PNG
- DOC
- DOCX
- PDF
- TXT
- CSV
> **Note:** The maximum supported file size is 10 MB.
4. Submit the support request.
The AgentRoof Support Team will review your request and respond accordingly.
##### Contacting Support Through the AgentRoof Website
1. Navigate to the AgentRoof website.
2. Hover over the **More** option in the top navigation menu.
3. Click **Contact Us**.
4. Select the toggle whether your want **Support** or **Sales**
On the Contact Us page, provide the following information:
1. Enter your name.
2. Enter your email address.
3. Enter your phone number.
4. Enter your message in the field labeled **"Do you have any message for us?"**
> **Note:** Before submitting the form, select the consent checkbox indicating that you agree to share your information for communication purposes, including support responses and promotional communications.
5. Click **Submit**.
Your inquiry will be submitted to the AgentRoof Support Team and they will assist you through the appropriate communication channel.
# Listing Alerts
# New Lisiting Alerts
#### What is a New Listing Alert?
The **New Listing Alert** feature allows you to automatically notify leads about newly listed properties that match their preferences.
Alerts can be configured using various property criteria, including location, property details, pricing, and other listing preferences. You can choose how often alerts are sent and assign them to individual leads, tags, stages, or sources.
Once configured, email alerts will be sent whenever matching properties become available, helping keep your leads informed about the latest listings.
---
#### Access New Listing Alerts
1. From the left-hand menu, click **Alerts**.
2. Select **New Listing Alerts**.
The New Listing Alerts page will be displayed.
This page provides a centralized view of all listing alerts configured in your CRM. From here, you can monitor alert assignments, view active and paused leads, and perform actions such as creating, editing, assigning, or deleting alerts.
You can also click the numbers displayed under the **Active** and **Paused** columns to view and manage the leads assigned to a particular alert.
---
#### Create a New Listing Alert
1. Navigate to the **New Listing Alerts** page.
2. Click **+ Add New Listing Alert**.
A popup window will appear prompting you to enter the alert details.
3. Enter an **Alert Name**.
4. Select one or more **Areas or Cities**.
5. Choose the **Property Category**.
6. Select the **Building Type**.
7. Select the **Building Style**.
8. Specify the **Property Status**.
9. Select the preferred **Basement Type**.
10. Enter the required **Garage Spaces**.
11. Specify the **Square Footage** requirements.
12. Enter the preferred **Days on Market**.
13. Select the **Alert Frequency**.
14. Specify the **Number of Properties** to include in each alert.
15. Define the **Bedroom Requirements**.
16. Define the **Bathroom Requirements**.
17. Enter the desired **Price Range**.
18. Click **Create Alert**.
The listing alert will be created successfully.
---
#### Edit a Listing Alert
1. Navigate to the **New Listing Alerts** page.
2. Locate the alert you want to modify.
3. Click **Edit**.
4. Make the required changes.
5. Click **Update Alert**.
The alert will be updated successfully.
---
Edit a New Listing Alert from a Lead Profile
1. Navigate to **CRM**.
2. Open the desired lead.
3. Select the **Profile** tab.
4. Scroll down to the **New Listing Alerts** section.
5. Locate the alert you want to edit.
6. Review the ownership label displayed for the alert:
- **Self** – The alert was created and is managed by the lead.
- **Agent** – The alert is managed by the realtor.
7. Click **Edit**.
8. If the alert is marked as **Self**, a confirmation message will appear indicating that ownership of the alert will be transferred from **Self** to **Agent**.
9. Click **Confirm** to continue.
10. Update the desired alert settings.
11. Click **Update Alert**.
The alert will be updated successfully.
**Note:** Editing a Self-managed alert transfers ownership of the alert from the lead to the realtor. After the transfer, the ownership label will be displayed as **Agent**.
---
#### View Leads Assigned to a Listing Alert
1. Navigate to the **New Listing Alerts** page.
2. Locate the desired listing alert.
3. Click the number displayed in the **Active** column to view active leads.
4. Click the number displayed in the **Paused** column to view paused leads.
The corresponding list of assigned leads will be displayed.
---
#### Manage Active Lead Assignments
1. Click the number displayed in the **Active** column.
2. Select one or more leads from the list.
3. Choose one of the following actions:
- **Pause** – Temporarily stop sending the alert to the selected leads.
- **Remove** – Remove the alert from the selected leads.
The selected action will be applied successfully.
---
#### Manage Paused Lead Assignments
1. Click the number displayed in the **Paused** column.
2. Select one or more leads from the list.
3. Choose one of the following actions:
- **Resume** – Reactivate the alert for the selected leads.
- **Remove** – Remove the alert from the selected leads.
The selected action will be applied successfully.
#### Manage Listing Alert Status from a Lead Profile
You can also pause or resume a New Listing Alert directly from a lead profile.
1. Navigate to **CRM**.
2. Open the desired lead profile.
3. Locate the **New Listing Alerts** section.
4. Find the alert you want to manage.
#### Pause a Listing Alert
1. Click **Pause** next to the alert.
2. A confirmation message will appear.
3. Click **Confirm**.
The alert will be paused for the selected lead, and no further listing alert emails will be sent until it is resumed.
#### Resume a Listing Alert
1. Click **Resume** next to the paused alert.
2. A confirmation message will appear.
3. Click **Confirm**.
The alert will be reactivated and will continue sending matching listing alerts to the lead.
---
#### Assign a Listing Alert
Listing alerts can be assigned from multiple locations within AgentRoof CRM.
#### Assign from the Alerts Page
1. Navigate to **New Listing Alerts**.
2. Select the desired listing alert.
3. Click **Assign**.
You can assign the alert using any of the following options:
#### Assign to Leads
1. Click **Leads**.
2. Select one or more leads.
3. Click **Apply**.
#### Assign to Tags
1. Click **Tags**.
2. Select one or more tags.
3. Click **Apply**.
The alert will be assigned to all leads associated with the selected tags.
#### Assign to Stages
1. Click **Stages**.
2. Select one or more stages.
3. Click **Apply**.
The alert will be assigned to all leads associated with the selected stages.
#### Assign to Sources
1. Click **Sources**.
2. Select one or more sources.
3. Click **Apply**.
The alert will be assigned to all leads associated with the selected sources.
---
#### Assign from the CRM Page
1. Navigate to **CRM**.
2. Select one or more leads.
3. Click M**ore** from the top menu.
4. Click **New Listing Alert.**
5. Select the desired alert.
6. Click **Apply**.
The alert will be assigned successfully.
---
#### Assign from a Lead Profile
1. Navigate to **CRM**.
2. Open the desired lead profile.
3. Locate the **New Listing Alerts** section.
4. Click **Add Alert**.
5. Select the desired listing alert.
6. Click **Submit**.
The alert will be assigned successfully.
---
#### Remove a Listing Alert from a Lead Profile
1. Navigate to **CRM**.
2. Open the desired lead profile.
3. Locate the **New Listing Alerts** section.
4. Find the alert you want to remove.
5. Click **Delete**.
6. Confirm the removal if prompted.
The listing alert will be removed successfully from the lead.
**Note:** This action only removes the alert assignment from the lead profile. The New Listing Alert itself will remain available in the CRM. To permanently delete a New Listing Alert, it must be removed from all assigned leads and then deleted from the **New Listing Alerts** page.
---
#### Delete a Listing Alert
1. Navigate to the **New Listing Alerts** page.
2. Select the checkbox next to the alert you want to delete.
3. Click **Delete** from the top menu.
4. Confirm the deletion.
> **Note:** Listing alerts that are currently assigned to one or more leads cannot be deleted. Remove the alert assignment from all associated leads before attempting to delete the alert.
The selected listing alert will be deleted successfully.
---
#### Alert Execution
Listing alerts are processed automatically each day between **9:00 AM and 10:00 AM**.
Matching property listings will be sent to assigned leads according to the selected alert frequency.
---
#### Important Notes
- If a lead does not open up to 10 consecutive listing alert emails, the alert will automatically stop sending to that lead. This helps protect email deliverability and reduces the likelihood of emails being marked as spam.
- Listing alerts assigned to leads cannot be deleted until they have been removed from all associated leads.
You have successfully learned how to manage New Listing Alerts in AgentRoof CRM.
# Neighborhood Alert
#### What is a Neighbourhood Alert?
The Neighbourhood Alert feature allows you to send sold listing alerts to your leads based on specific criteria such as City, Property Type, Price Range, Bedrooms, Bathrooms, and more.
You can configure the alert frequency and assign alerts to Tags, Stages, Sources, or individual leads. Once configured, email notifications are automatically sent whenever a property matching the selected criteria is sold, helping your leads stay informed about activity in their neighbourhood.
---
#### Create a Neighbourhood Alert
1. Navigate to the **Alerts** page.
2. Click **Neighbourhood Alert**.
3. Click the **+** icon in the Neighbourhood Alerts row.
##### Complete the Required Fields
1. Enter the name of the alert.
2. Select the area.
3. Select the property category.
4. Select the building type.
5. Select the building style.
6. Select the property status.
7. Select the basement option.
8. Select the garage space requirement.
9. Select the square footage range.
10. Select the sold period (in months).
11. Select the alert frequency.
12. Enter the number of properties to send. A maximum of 10 properties can be included in a single alert.
13. Enter the number of bedrooms.
14. Enter the number of bathrooms.
15. Specify the price range between $0 and $5,000,000.
16. Click **Create Alert**.
The new Neighbourhood Alert will be created successfully.
---
#### Edit a Neighbourhood Alert
Neighbourhood Alerts can be edited from either the Neighbourhood Alerts page or directly from a lead's profile.
##### Edit from the Neighbourhood Alerts Page
1. Locate the Neighbourhood Alert you want to modify.
2. Click **Edit** under the Actions column.
3. Update the required criteria and settings.
4. Click **Update Alert**.
The changes will be saved successfully.
---
##### Edit from the Lead Profile
1. Navigate to **CRM**.
2. Open the desired lead record.
3. Click the **Profile** tab.
4. Scroll down to the **Neighbourhood Alert** section.
5. Click the **Edit** icon next to the desired alert.
> **Note:** If the alert is labelled **Self**, it was originally created by the lead through the website.
6. Review the confirmation message and click **Continue**.
7. Update the required criteria and settings.
8. Click **Update Alert**.
> **Note:** Editing a lead-created alert may override the lead's original preferences. Once the changes are saved, ownership of the alert will change from **Self** to **Agent**.
The changes will be saved successfully.
---
#### Delete a Neighbourhood Alert
1. Select the checkbox next to the Neighbourhood Alert you want to delete.
2. Click the **Delete** icon from the Neighbourhood Alerts row.
3. Review the confirmation message.
4. Click **Confirm**.
The selected Neighbourhood Alert will be deleted successfully.
> **Note:** Neighbourhood Alerts that are currently assigned to active leads cannot be deleted.
---
#### Assign a Neighbourhood Alert
Neighbourhood Alerts can be assigned from multiple locations within AgentRoof CRM.
##### Assign from the Neighbourhood Alert Page
1. Select the checkbox next to the desired Neighbourhood Alert.
**Assign to Leads**
1. Hover over the **Lead** icon.
2. Click **Assign to Lead**.
3. Search for and select the desired leads.
4. Click **Assign**.
You can assign the alert to multiple leads.
**Assign to Tags**
1. Hover over the **Tag** icon.
2. Click **Assign to Tag**.
3. Select one or more tags.
4. Click **Assign**.
**Assign to Stages**
1. Hover over the **Stage** icon.
2. Click **Assign to Stage**.
3. Select one or more stages.
4. Click **Assign**.
**Assign to Sources**
1. Hover over the **Source** icon.
2. Click **Assign to Source**.
3. Select one or more sources.
4. Click **Assign**.
> **Note:** If the required Tag, Stage, or Source is not available, you can create a new one directly from the assignment window before completing the assignment.
The selected Neighbourhood Alert will be assigned successfully.
---
##### Assign from the CRM Page
1. Navigate to **CRM**.
2. Select the checkbox next to the desired lead.
3. Click **Neighbourhood Alert** from the action bar.
4. Select the Neighbourhood Alert you want to assign.
5. Click **Assign**.
The selected Neighbourhood Alert will be assigned successfully.
---
##### Assign from the Lead Profile
1. Navigate to **CRM**.
2. Open the desired lead record.
3. Click the **Profile** tab.
4. Scroll to the **Neighbourhood Alert** section.
5. Click the **+** icon.
6. Select the desired Neighbourhood Alert.
7. Confirm the selection.
The selected Neighbourhood Alert will be assigned successfully.
---
#### Manage Leads Assigned to a Neighbourhood Alert
##### View Active Leads
1. Locate the desired Neighbourhood Alert.
2. Click the **Active Lead Count**.
A pop-up window displays all active leads currently assigned to the selected Neighbourhood Alert.
---
##### Pause Active Leads
1. Click the **Active Lead Count** for the desired Neighbourhood Alert.
2. Select the checkbox next to the lead or leads you want to pause.
3. Click **Pause**.
4. Review the confirmation message.
5. Click **Confirm**.
The selected leads will remain assigned to the Neighbourhood Alert but will temporarily stop receiving alert notifications.
---
##### View Paused Leads
1. Click the **Paused Lead Count** for the desired Neighbourhood Alert.
A pop-up window displays all leads currently paused for the selected Neighbourhood Alert.
---
##### Resume Paused Leads
1. Click the **Paused Lead Count** for the desired Neighbourhood Alert.
2. Select the checkbox next to the lead or leads you want to resume.
3. Click **Resume**.
4. Review the confirmation message.
5. Click **Confirm**.
The selected leads will resume receiving Neighbourhood Alert notifications based on the configured alert schedule.
---
#### Remove Leads from a Neighbourhood Alert
1. Click the **Active Lead Count** for the desired Neighbourhood Alert.
2. Select the checkbox next to the lead or leads you want to remove.
3. Click **Remove**.
4. Review the confirmation message.
5. Click **Confirm**.
The selected leads will be removed from the Neighbourhood Alert and will no longer receive notifications associated with that alert.
> **Important Notes**
>
> - Multiple leads can be selected and managed simultaneously.
> - Paused leads remain assigned to the Neighbourhood Alert.
> - Removed leads are no longer associated with the Neighbourhood Alert.
> - Active and paused lead counts update automatically after changes.
---
#### Manage Neighbourhood Alerts from a Lead Profile
##### Pause a Neighbourhood Alert
1. Navigate to **CRM**.
2. Open the desired lead record.
3. Click the **Profile** tab.
4. Locate the **Neighbourhood Alert** section.
5. Click **Pause** next to the desired alert.
6. Review the confirmation message.
7. Click **Confirm**.
The Neighbourhood Alert will be paused successfully and the lead will temporarily stop receiving notifications from that alert.
---
##### Resume a Neighbourhood Alert
1. Navigate to **CRM**.
2. Open the desired lead record.
3. Click the **Profile** tab.
4. Locate the paused Neighbourhood Alert.
5. Click **Resume**.
6. Review the confirmation message.
7. Click **Confirm**.
The Neighbourhood Alert will be reactivated successfully and the lead will begin receiving notifications again according to the configured schedule.
---
##### Remove a Neighbourhood Alert from a Lead Profile
1. Navigate to **CRM**.
2. Open the desired lead record.
3. Click the **Profile** tab.
4. Locate the **Neighbourhood Alert** section.
5. Click **Delete** next to the desired alert.
6. Review the confirmation message.
7. Click **Confirm**.
The Neighbourhood Alert will be removed successfully from the lead profile.
---
#### How and When Are Neighbourhood Alerts Executed?
Neighbourhood Alerts are processed according to the configured alert frequency.
Alert emails are generated and delivered between **9:00 AM and 10:00 AM** on the scheduled execution date.
> **Important Note**
>
> If a lead does not open up to 10 consecutive Neighbourhood Alert emails, AgentRoof CRM automatically stops sending additional Neighbourhood Alert emails to that lead. This helps maintain email deliverability and reduces the likelihood of messages being marked as spam.
---
#### Conclusion
You have successfully learned how to create, edit, delete, assign, pause, resume, and manage Neighbourhood Alerts in AgentRoof CRM.
# Open House Alert
#### What Is an Open House Alert?
An **Open House** is a scheduled event where a property is made available for prospective buyers or tenants to visit and view in person.
The **Open House Alert** feature allows you to automatically notify leads about upcoming open houses that match their preferences. Alerts can be configured based on criteria such as city, property type, price range, open house date, bedrooms, bathrooms, and more.
You can choose the alert frequency and assign alerts to leads, tags, stages, or sources. Once configured, email alerts will be sent whenever matching open house listings become available.
#### Access Open House Alerts
1. From the left-hand menu, click **Alerts**.
2. Select **Open House Alerts**.
---
### Create an Open House Alert
1. Click the **+ Add New Open House Alert** button.
2. Complete the required fields:
- Alert Name
- Area or City
- Property Category
- Building Type
- Building Style
- Property Status
- Basement Type
- Garage Spaces
- Square Footage
- Days on Market
- Open On Date
- Alert Frequency
- Number of Properties to Include
- Bedroom Requirements
- Bathroom Requirements
- Price Range
3. Click **Create Alert**.
The Open House Alert will be created successfully.
---
#### Edit an Open House Alert
1. Navigate to **Open House Alerts**.
2. Locate the alert you want to modify.
3. Click **Edit**.
4. Update the required fields.
5. Click **Update Alert**.
The alert will be updated successfully.
---
#### View Leads Assigned to an Open House Alert
1. Navigate to **Open House Alerts**.
2. Locate the desired alert.
The number of assigned leads is displayed under the alert.
#### View Active Leads
1. Click the number displayed in the **Active** column.
The list of active leads assigned to the alert will be displayed.
2. Select one or more leads, or use **Select All**.
3. Choose one of the following actions:
- **Pause** – Temporarily stop sending the alert to the selected leads.
- **Delete** – Remove the alert from the selected leads.
#### View Paused Leads
1. Click the number displayed in the **Paused** column.
The list of paused leads assigned to the alert will be displayed.
2. Select one or more leads, or use **Select All**.
3. Choose one of the following actions:
- **Resume** – Reactivate the alert for the selected leads.
- **Delete** – Remove the alert from the selected leads.
#### Manage Open House Alert Status from a Lead Profile
You can also pause or resume an Open House Alert directly from a lead profile.
1. Navigate to **CRM**.
2. Open the desired lead profile.
3. Locate the **Open House Alerts** section.
4. Find the alert you want to manage.
#### Pause an Open House Alert
1. Click **Pause** next to the alert.
2. A confirmation message will appear.
3. Click **Confirm**.
The alert will be paused successfully, and no further Open House Alert emails will be sent until it is resumed.
#### Resume an Open House Alert
1. Click **Resume** next to the paused alert.
2. A confirmation message will appear.
3. Click **Confirm**.
The alert will be reactivated successfully, and matching Open House Alert emails will continue to be sent to the lead.
---
#### Assign an Open House Alert
Open House Alerts can be assigned from the Alerts page, CRM page, or a Lead Profile.
#### Assign from the Alerts Page
1. Navigate to **Open House Alerts**.
2. Select the desired alert.
#### Assign to Leads
1. Click **Leads** from the top menu.
2. Select one or more leads.
3. Click **Submit**.
#### Assign to Tags
1. Click **Tags** from the top menu.
2. Select one or more tags.
3. Click **Apply**.
The alert will be assigned to all leads associated with the selected tags.
#### Assign to Stages
1. Click **Stages** from the top menu.
2. Select one or more stages.
3. Click **Apply**.
The alert will be assigned to all leads associated with the selected stages.
#### Assign to Sources
1. Click **Sources** from the top menu.
2. Select one or more sources.
3. Click **Apply**.
The alert will be assigned to all leads associated with the selected sources.
#### Assign from the CRM Page
1. Navigate to **CRM**.
2. Select one or more leads.
3. Click **More** from the top menu.
4. Click **Open House Alert.**
5. Select the desired Open House Alert.
6. Save the assignment.
#### Assign from a Lead Profile
1. Navigate to **CRM**.
2. Open the desired lead profile.
3. Locate the **Open House Alerts** section.
4. Click **Add**.
5. Select the desired Open House Alert.
6. Click **Submit**.
The alert will be assigned successfully.
---
> **Note:** Alerts assigned to one or more leads cannot be deleted. Remove the alert from all associated leads before attempting to delete it.
#### Delete from the Alerts Page
1. Navigate to **Open House Alerts**.
2. Select the alert you want to delete.
3. Click **Delete** from the top menu.
4. Confirm the deletion.
#### Delete from a Lead Profile
1. Navigate to **CRM**.
2. Open the desired lead profile.
3. Locate the **Open House Alerts** section.
4. Click **Delete** next to the alert you want to remove.
5. Confirm the action.
The Open House Alert will be removed successfully from the selected lead.
**Note:** This action only removes the alert assignment from the lead profile. The Open House Alert itself will remain available in the CRM. To permanently delete an Open House Alert, it must be removed from all assigned leads and then deleted from the **Open House Alerts** page.
---
#### Alert Execution
Open House Alerts are processed automatically each day between **9:00 AM and 10:00 AM**.
Matching open house listings will be sent to assigned leads according to the selected frequency.
#### Important Notes
- If a lead does not open up to 10 consecutive alert emails, the alert will automatically stop sending to that lead. This helps protect email deliverability and reduces the likelihood of emails being marked as spam.
- Alerts assigned to leads cannot be deleted until they have been removed from all associated leads.
You have successfully learned how to manage Open House Alerts in AgentRoof CRM.
# Price Drop Alert
#### What is Price Drop Alert?
The Price Drop Alert feature allows you to send listing alerts to your leads based on specific criteria such as City, Property Type, Price Range, Percentage of Price Drop, Bedrooms, Bathrooms, and more.
You can configure the alert frequency and assign alerts to Tags, Stages, Sources, or individual leads. Once configured, email notifications are automatically sent whenever a property matching the selected criteria experiences a price reduction, helping your leads stay informed about the latest price drop opportunities.
---
#### Create a Price Drop Alert
1. Navigate to **Alerts > Price Drop Alerts**.
2. Click the **+** icon in the Price Drop Alerts row.
3. Enter the name of the alert.
4. Select the area.
5. Select the property category.
6. Select one or more building types.
7. Select one or more building styles.
8. Select the property status.
9. Select the basement option.
10. Select the garage space requirement.
11. Select the square footage range.
12. Select the Days on Market.
13. Select the alert frequency.
14. Enter the number of properties to send. A maximum of 10 properties can be included in a single alert.
15. Enter the number of bedrooms.
16. Enter the number of bathrooms.
17. Specify the price range between $0 and $5,000,000.
18. Select the percentage of price drop between 1% and 50%.
19. Click **Create Alert**.
The new Price Drop Alert will be created successfully.
---
#### Edit a Price Drop Alert
Price Drop Alerts can be edited from either the Price Drop Alerts page or directly from a lead's profile.
##### Edit from the Price Drop Alerts Page
1. Navigate to the Price Drop Alerts page.
2. Locate the alert you want to update.
3. Click **Edit** under the Actions column.
4. Modify the required criteria and settings.
5. Click **Update Alert**.
The changes will be saved successfully.
---
##### Edit from the Lead Profile
1. Navigate to **CRM**.
2. Open the desired lead record.
3. Click the **Profile** tab.
4. Scroll down to the **Price Drop Alerts** section.
5. Click the **Edit** icon next to the desired alert.
> **Note:** If the alert is labelled **Self**, it was originally created by the lead through the website.
6. Review the confirmation message and click **Continue**.
7. Modify the required criteria and settings.
8. Click **Update Alert**.
> **Note:** Editing a lead-created alert may override the lead's original preferences. Once the changes are saved, ownership of the alert will change from **Self** to **Agent**.
The changes will be saved successfully.
---
#### Delete a Price Drop Alert
##### How to Delete a Price Drop Alert?
1. Navigate to the **Price Drop Alerts** page.
2. Select the checkbox next to the alert you want to delete.
3. Click the **Delete** icon from the Price Drop Alerts row.
4. Review the confirmation message.
5. Click **Confirm** to proceed.
The selected alert will be deleted successfully.
> **Note**
>
> Price Drop Alerts that are currently assigned to active leads cannot be deleted.
---
#### Assign a Price Drop Alert
Price Drop Alerts can be assigned from multiple locations within AgentRoof CRM.
##### Assign from the Price Drop Alerts Page
1. Navigate to the **Price Drop Alerts** page.
2. Select the checkbox next to the alert you want to assign.
**Assign to Leads**
1. Hover over the **Lead** icon.
2. Click **Assign to Lead**.
3. Search for and select one or more leads.
4. Click **Assign**.
**Assign to Tags**
1. Hover over the **Tag** icon.
2. Click **Assign to Tag**.
3. Select one or more tags.
4. Click **Assign**.
**Assign to Stages**
1. Hover over the **Stage** icon.
2. Click **Assign to Stage**.
3. Select one or more stages.
4. Click **Assign**.
**Assign to Sources**
1. Hover over the **Source** icon.
2. Click **Assign to Source**.
3. Select one or more sources.
4. Click **Assign**.
> **Note**
>
> If the required Tag, Stage, or Source is not available, you can create a new one directly from the assignment window before completing the assignment.
The selected Price Drop Alert will be assigned successfully.
---
##### Assign from the CRM Page
1. Navigate to **CRM**.
2. Select the checkbox next to the desired lead.
3. Click **Price Drop Alert** from the action bar.
4. Select the Price Drop Alert you want to assign.
5. Click **Assign**.
The selected Price Drop Alert will be assigned successfully.
---
#### Assign from the Lead Profile Page
1. Navigate to **CRM**.
2. Open the desired lead record.
3. Click the **Profile** tab.
4. Scroll to the **Price Drop Alert** section.
5. Click the **+** icon.
6. Select the desired Price Drop Alert.
7. Confirm the selection.
The selected Price Drop Alert will be assigned successfully.
---
#### Manage Leads Assigned to a Price Drop Alert
##### View Active Leads
1. Locate the desired Price Drop Alert.
2. Click the **Active Lead Count**.
A pop-up window displays all active leads currently assigned to the selected Price Drop Alert.
---
##### Pause Active Leads
1. Click the **Active Lead Count** for the desired Price Drop Alert.
2. Select the checkbox next to the lead or leads you want to pause.
3. Click **Pause**.
4. Review the confirmation message.
5. Click **Confirm**.
The selected leads will remain assigned to the Price Drop Alert but will temporarily stop receiving alert notifications.
---
##### View Paused Leads
1. Click the **Paused Lead Count** for the desired Price Drop Alert.
A pop-up window displays all leads currently paused for the selected Price Drop Alert.
---
##### Resume Paused Leads
1. Click the **Paused Lead Count** for the desired Price Drop Alert.
2. Select the checkbox next to the lead or leads you want to resume.
3. Click **Resume**.
4. Review the confirmation message.
5. Click **Confirm**.
The selected leads will resume receiving Price Drop Alert notifications according to the configured alert schedule.
---
##### Remove Leads from a Price Drop Alert
1. Click the **Active Lead Count** for the desired Price Drop Alert.
2. Select the checkbox next to the lead or leads you want to remove.
3. Click **Remove**.
4. Review the confirmation message.
5. Click **Confirm**.
The selected leads will be removed from the Price Drop Alert and will no longer receive notifications associated with that alert.
> **Important Notes**
>
> - Multiple leads can be selected and managed simultaneously.
> - Paused leads remain assigned to the Price Drop Alert.
> - Removed leads are no longer associated with the Price Drop Alert.
> - Active and paused lead counts update automatically after changes.
---
#### Manage Price Drop Alerts from a Lead Profile
##### Pause a Price Drop Alert
1. Navigate to **CRM**.
2. Open the desired lead record.
3. Click the **Profile** tab.
4. Locate the **Price Drop Alert** section.
5. Click **Pause** next to the desired alert.
6. Review the confirmation message.
7. Click **Confirm**.
The Price Drop Alert will be paused successfully and the lead will temporarily stop receiving Price Drop Alert notifications.
---
##### Resume a Price Drop Alert
1. Navigate to **CRM**.
2. Open the desired lead record.
3. Click the **Profile** tab.
4. Locate the paused Price Drop Alert.
5. Click **Resume**.
6. Review the confirmation message.
7. Click **Confirm**.
The Price Drop Alert will be reactivated successfully and the lead will begin receiving notifications again according to the configured schedule.
---
##### Remove a Price Drop Alert from a Lead Profile
1. Navigate to **CRM**.
2. Open the desired lead record.
3. Click the **Profile** tab.
4. Locate the **Price Drop Alert** section.
5. Click **Delete** next to the desired alert.
6. Review the confirmation message.
7. Click **Confirm**.
The Price Drop Alert will be removed successfully from the lead profile.
---
#### How and When Are Price Drop Alerts Executed?
Price Drop Alerts are processed according to the configured alert frequency.
Alert emails are generated and delivered between **9:00 AM and 10:00 AM** on the scheduled execution date.
> **Note**
>
> If a lead does not open up to 10 consecutive Price Drop Alert emails, AgentRoof CRM automatically stops sending additional Price Drop Alert emails to that lead. This helps maintain email deliverability and reduces the likelihood of messages being marked as spam.
---
#### Conclusion
You have successfully learned how to create, edit, delete, assign, pause, resume, and manage Price Drop Alerts in AgentRoof CRM.
# Automation
# Market Updates
#### What Are Market Updates?
Market Updates help keep your leads informed about current real estate market trends and activity in their area.These updates are automatically sent to assigned leads and provide valuable market information, helping agents stay connected with their audience through regular communication.
#### Access Market Updates
1. From the left-hand menu, click **Automation**.
2. Select **Market Updates**.
The Market Updates page will be displayed.
---
#### Market Update Details
The Market Updates page displays information including:
- Active
- Paused
- Frequency
- Run On
- Next Email Date
- Assigned Tags
- Assigned Stages
- Assigned Sources
- Actions
These details help you track Market Update schedules and assignments.
---
#### View Market Updates
1. Navigate to **Automation > Market Updates**.
2. Locate the desired Market Update.
3. Click the **View** button.
You can view the selected Market Update.
#### View Active Leads
1. Click the number displayed in the **Active** column.
The list of active leads assigned to the Market Update will be displayed.
2. Select one or more leads.
3. Choose one of the following actions:
- **Pause** – Temporarily stop sending Market Updates to the selected leads.
- **Delete** – Remove the Market Update from the selected leads.
#### View Paused Leads
1. Click the number displayed in the **Paused** column.
The list of paused leads assigned to the Market Update will be displayed.
2. Select one or more leads.
3. Choose one of the following actions:
- **Resume** – Reactivate the Market Update for the selected leads.
- **Delete** – Remove the Market Update from the selected leads.
---
#### Assign a Market Update
Market Updates can be assigned through the Market Updates page or directly from a Lead Profile.
#### Assign from the Market Updates Page
1. Select the desired Market Update.
2. Click **Assign**.
You can assign the Market Update using any of the following options:
#### Assign to Leads
1. Click **Leads**.
2. Select one or more leads.
3. Click **Apply**.
#### Assign to Tags
1. Click **Tags**.
2. Select one or more tags.
3. Click **Apply**.
The Market Update will be assigned to all leads associated with the selected tags.
#### Assign to Stages
1. Click **Stages**.
2. Select one or more stages.
3. Click **Apply**.
The Market Update will be assigned to all leads associated with the selected stages.
#### Assign to Sources
1. Click **Sources**.
2. Select one or more sources.
3. Click **Apply**.
The Market Update will be assigned to all leads associated with the selected sources.
#### Assign from the CRM Page
1. Navigate to **CRM**.
2. Select one or more leads using the checkboxes.
3. Click **More** from the top menu.
4. Click **Market Updates**.
5. Select the desired Market Update.
6. Click **Submit**.
The Market Update will be assigned successfully.
#### Assign from a Lead Profile
1. Navigate to **CRM**.
2. Open the desired lead profile.
3. Locate the **Market Updates** section.
4. Click **Add**.
5. Select the desired Market Update.
6. Click **Submit**.
The Market Update will be assigned successfully.
---
#### Market Update Execution
Market Updates are processed automatically at **7:30 AM**.
Currently, Market Updates are scheduled to run **monthly on the 10th of each month**.
#### Important Notes
- Market Updates cannot be created manually.
- Existing Market Updates cannot be deleted.
- Market Updates can only be viewed and assigned to leads, tags, stages, or sources.
- Lead assignments can be managed by pausing, resuming, or removing the Market Update from individual leads.
You have successfully learned how to manage Market Updates in AgentRoof CRM.
# Realestate News
#### What Are Real Estate Newsletters?
Real Estate Newsletters help keep your leads informed with regular real estate content and updates.
These newsletters are automatically sent to assigned leads based on a predefined schedule and help agents stay connected with their audience through ongoing communication.
---
#### Access Real Estate Newsletters
1. Log in to AgentRoof CRM.
2. From the left-hand menu, click **Automation**.
3. Select **Real Estate Newsletters**.
The Real Estate Newsletters page displays information such as:
- Newsletter Name
- Active Leads
- Paused Leads
- Frequency
- Run On
- Next Email On
- Assigned Tags
- Assigned Stages
- Assigned Source
- Actions
---
#### View a Newsletter Preview
1. Navigate to **Automation > Real Estate Newsletters**.
2. Locate the desired newsletter.
3. Click **View** in the Actions column.
The newsletter preview will be displayed.
---
#### Important Notes
- Real Estate Newsletters are system-managed.
- Newsletters cannot be created manually.
- Newsletters cannot be deleted.
- Newsletters can only be viewed and assigned to leads, tags, stages, or sources.
---
#### View Active Leads
1. Navigate to **Automation > Real Estate Newsletters**.
2. Locate the desired newsletter.
3. Click the number displayed in the **Active** column.
A list of active leads assigned to the newsletter will be displayed.
#### Manage Active Leads
1. Select one or more leads.
2. Choose one of the following actions:
- **Pause** – Temporarily stop sending the newsletter to the selected leads.
- **Delete**– Remove the newsletter from the selected leads.
The selected action will be applied successfully.
---
#### View Paused Leads
1. Navigate to **Automation > Real Estate Newsletters**.
2. Locate the desired newsletter.
3. Click the number displayed in the **Paused** column.
A list of paused leads assigned to the newsletter will be displayed.
#### Manage Paused Leads
1. Select one or more leads.
2. Choose one of the following actions:
- **Resume** – Reactivate the newsletter for the selected leads.
- **Delete**– Remove the newsletter from the selected leads.
The selected action will be applied successfully.
---
#### Assign a Real Estate Newsletter
Real Estate Newsletters can be assigned through the Real Estate Newsletters page, the CRM page, or directly from a Lead Profile.
#### Assign from the Real Estate Newsletters Page
1. Navigate to **Automation > Real Estate Newsletters**.
2. Select the desired newsletter.
#### Assign to Leads
1. Click **Leads**.
2. Select one or more leads.
3. Click **Submit**.
The newsletter will be assigned successfully.
#### Assign to Tags
1. Click **Tags**.
2. Select one or more tags.
3. Click **Apply**.
The newsletter will be assigned to all leads associated with the selected tags.
#### Assign to Stages
1. Click **Stages**.
2. Select one or more stages.
3. Click **Apply**.
The newsletter will be assigned to all leads associated with the selected stages.
#### Assign to Sources
1. Click **Sources**.
2. Select one or more sources.
3. Click **Apply**.
The newsletter will be assigned to all leads associated with the selected sources.
---
#### Assign from the CRM Page
1. Navigate to **CRM**.
2. Select one or more leads.
3. Click **More** from the top menu.
4. Click **Newsletter.**
5. Select the desired newsletter.
6. Click **Submit**.
The newsletter will be assigned successfully.
---
#### Assign from a Lead Profile
1. Navigate to **CRM**.
2. Open the desired lead profile.
3. Locate the **Newsletters** section.
4. Click **Add**.
5. Select the desired newsletter.
6. Click **Submit**.
The newsletter will be assigned successfully.
---
#### Newsletter Execution
Real Estate Newsletters are processed automatically at **7:30 AM**.
Currently, newsletters are scheduled to run **biweekly**, on the **first and third Friday of each month**.
Matching newsletter content will be delivered automatically to all assigned leads according to the configured schedule.
---
You have successfully learned how to manage Real Estate Newsletters in AgentRoof CRM.
# Action Plan
#### What Is an Action Plan?
An Action Plan is an automated workflow that performs predefined actions for assigned leads over a specified period of time.
Action Plans help automate follow-up activities such as:
- Sending emails
- Sending SMS messages
- Adding tags
- Removing tags
- Changing stages
- Creating notes
- Assigning other Action Plans
Once assigned, the Action Plan automatically executes each step according to the configured schedule.
Action Plans can be assigned to:
- Individual leads
- Tags
- Stages
- Sources
This helps automate lead nurturing and follow-up processes at scale.
---
#### Access Action Plans
1. Navigate to **Automation > Action Plans**.
The Action Plans page displays all available Action Plans.
##### From this page, you can view:
- Action Plan Name
- Number of Steps
- Active Leads
- Paused Leads
- Stopped Leads
- Completed Leads
- Available Actions
---
#### View an Action Plan
1. Navigate to **Automation > Action Plans**.
2. Locate the desired Action Plan.
3. Click **View**.
The configured Action Plan steps will be displayed.
---
#### Create an Action Plan
1. Navigate to **Automation > Action Plans**.
2. Click **Add Action Plan**.
3. Enter the Action Plan Name.
4. Click **Add Action**.
5. Configure one or more actions.
6. Click **Save**.
The Action Plan will be created successfully.
#### Available Action Types
#### Send Email
- Select **Send Email**.
- Select an Email Template.
- Configure the execution timing.
- Save the action.
#### Send SMS
- Select **Send SMS**.
- Select an SMS Template.
- Configure the execution timing.
- Save the action.
#### Add Tags
- Select **Add Tags**.
- Select one or more tags.
- Configure the execution timing.
- Save the action.
#### Remove Tags
- Select **Remove Tags**.
- Select one or more tags.
- Configure the execution timing.
- Save the action.
#### Change Stage
- Select **Change Stage**.
- Select the desired stage.
- Configure the execution timing.
- Save the action.
**Note:** Only one stage can be selected at a time.
#### Add Note
- Select **Add Note**.
- Enter the note content.
- Configure the execution timing.
- Save the action.
#### Assign Action Plan
- Select **Assign Action Plan**.
- Select the desired Action Plan.
- Configure the execution timing.
- Save the action.
#### Additional Action Types
You can also configure:
- Pause Specific Action Plan
- Pause All Action Plans
- Repeat Action Plan
##### Automatically Pause When a Lead Replies
While creating or editing an Action Plan, you can enable:
**Pause the action plan when the lead replies to an email.**
When enabled, future Action Plan steps automatically stop executing once the lead replies.
---
#### Edit an Action Plan
1. Navigate to **Automation > Action Plans**.
2. Locate the Action Plan.
3. Click **Edit**.
4. Modify the required settings.
5. Click **Update**.
The Action Plan will be updated successfully.
> **Note:** Changes made to an Action Plan apply immediately to all future executions. For leads that are already progressing through the Action Plan, previously completed steps will remain unchanged, while any upcoming steps that have not yet been executed will follow the updated configuration. Newly assigned leads will follow the updated Action Plan from the beginning.
---
#### Assign an Action Plan
Action Plans can be assigned from multiple locations within AgentRoof CRM.
##### From the Action Plans Page
1. Select the desired Action Plan.
You can assign it to:
**Leads**
1. Click **Leads**.
2. Select one or more leads.
3. Click **Submit**.
**Tags**
1. Click **Tags**.
2. Select one or more tags.
3. Click **Apply**.
**Stages**
1. Click **Stages**.
2. Select a stage.
3. Click **Apply**.
**Sources**
1. Click **Sources**.
2. Select one or more sources.
3. Click **Apply**.
The Action Plan will be assigned successfully.
---
##### From the CRM Page
1. Navigate to **CRM**.
2. Select one or more leads.
3. Click **Action Plan**.
4. Select the desired Action Plan.
5. Click **Submit**.
The Action Plan will be assigned successfully.
---
##### From the Lead Profile Page
1. Navigate to **CRM**.
2. Open the desired lead record.
3. Click the **Profile** tab.
4. Scroll down to the **Action Plans** section.
5. Click the **+** icon.
6. Select the Action Plan you want to assign.
7. Confirm the assignment.
The selected Action Plan will be assigned successfully.
---
#### Manage Assigned Leads
Each Action Plan displays lead counts under:
- Active
- Paused
- Stopped
- Completed
Click the number displayed in any column to view the corresponding leads.
##### Active Leads
Available actions:
- Pause
- Stop
- Remove
##### Paused Leads
Available actions:
- Resume
- Remove
##### Stopped Leads
Available actions:
- Restart
- Remove
##### Completed Leads
Available actions:
- Restart
---
#### Change Action Plan Status from a Lead Profile
1. Navigate to **CRM**.
2. Open the desired lead profile.
3. Locate the **Action Plans** section.
Available actions depend on the Action Plan status.
**If Active**
- Pause
- Stop
- Delete
**If Paused**
- Resume
- Delete
**If Stopped**
- Restart
- Delete
---
#### Delete an Action Plan
1. Navigate to **Automation > Action Plans**.
2. Select the Action Plan.
3. Click **Delete**.
4. Confirm the deletion.
> **Note:** Action Plans assigned to one or more leads cannot be deleted. You must first remove the Action Plan from all associated leads before deleting it.
---
#### Understanding Action Plan Statuses
Status
Description
Active
The Action Plan is currently executing.
Paused
The Action Plan is temporarily suspended and can later resume.
Stopped
The Action Plan was terminated before completion and can be restarted.
Completed
All configured steps have executed successfully.
---
#### Conclusion
You have successfully learned how to manage Action Plans in AgentRoof CRM.
# Smart Listing Alert
What is it ?
Its settings
# Lead Engagement Alert
#### What Are Lead Engagement Alerts?
Lead Engagement Alerts help you stay informed about how your leads interact with your website, emails, and SMS communications.
AgentRoof CRM provides comprehensive options to track lead engagement across your website, emails, and SMS. You can choose to be notified when leads become active after a set number of hours or days, when they interact with properties, or when they perform actions such as subscribing to listing alerts. You can also track email and SMS engagement, such as when a lead clicks a link, unsubscribes, or replies.
Notifications can be delivered through the AgentRoof application, email, or both, depending on the alert type.
#### Access Lead Engagement Alerts
1. From the left-hand menu, click **Automation.**
2. Select **Lead Engagement Alerts**.
The Lead Engagement Alerts page will be displayed.
> **Note:** Some engagement alerts are system defaults and cannot be modified.
---
#### Enable or Disable Lead Engagement Alerts
A toggle switch is available at the top of the Lead Engagement Alerts page.
- Turn the toggle **On** to enable Lead Engagement Alerts.
- Turn the toggle **Off** to disable all Lead Engagement Alerts.
When disabled, no lead engagement notifications will be sent regardless of the individual alert settings configured below.
Click **Update** to save the changes.
---
#### Website Engagement Alerts
#### Notify When a Lead Becomes Active After Selected Hours
Receive a notification when a lead becomes active after a specified number of hours.
- Minimum value: 1 hour
- Maximum value: 23 hours
Select how you would like to receive the notification:
- App Notification
- Email Notification
#### Notify When a Lead Becomes Active After Selected Days
Receive a notification when a lead becomes active after a specified number of days.
- Minimum value: 1 day
- Maximum value: 364 days
Select the desired notification method.
#### Notify When a Lead Becomes Inactive
Receive a notification when a lead becomes inactive for a specified number of days.
- Minimum value: 7 days
- Maximum value: 99 days
Select the desired notification method.
#### Notify When a Lead Views the Same Property Multiple Times
Receive a notification when a lead views the same property repeatedly.
- Minimum value: 2 views
- Maximum value: 99 views
Select the desired notification method.
#### Notify When a Lead Views Multiple Different Properties
Receive a notification when a lead views more than a specified number of different properties.
- Minimum value: 2 properties
- Maximum value: 99 properties
Select the desired notification method.
#### Notify When a Lead Subscribes to a Listing Alert
Receive a notification whenever a lead subscribes to a Listing Alert.
> **Note:** This is a default system notification. The App and Email notification options cannot be modified.
---
#### Email Engagement Alerts
Use the checkboxes next to each alert to choose whether notifications should be sent through the App, Email, or both.
#### Available Email Engagement Notifications
- Notify me when a lead clicks a link in an email.
- Notify me when a lead opens an email.
- Notify me when a lead unsubscribes from email communications.
- Notify me when a lead replies to an email.
> **Note:** The notification for lead email replies is enabled by default.
---
#### SMS Engagement Alerts
#### Notify When a Lead Replies to an SMS
Receive a notification whenever a lead replies to an SMS message.
> **Note:** This notification is enabled by default.
---
#### Save Changes
After making any changes to the notification settings:
1. Click **Update**.
The Lead Engagement Alert settings will be updated successfully.
You have successfully learned how to manage Lead Engagement Alerts in AgentRoof CRM.
# Email and SMS Templates
# Email Templates
#### What Are Email Templates?
Email Templates allow you to create reusable email content that can be used throughout AgentRoof CRM.
They help save time by allowing you to create predefined email messages that can be used in Action Plans, manual email communication, and other automation features.
Email Templates support customizable subjects, email content, merge fields, images, and file attachments.
---
#### Access Email Templates
1. From the left-hand menu, Select **Templates**.
2. Click **Email Templates**.
The Email Templates page will be displayed.
Email Templates are organized into folders for easier management.
---
#### Understanding Template Folders
Templates are stored inside folders.
The system includes default folders created by AgentRoof.
#### System Folders
System-generated folders:
- Start with **AgentRoof**
- Cannot be edited
- Cannot be deleted
In addition to system folders, you can create your own folders to organize custom templates.
---
#### View Email Templates
1. Navigate to **CRM > Templates > Email Templates**.
2. Click the folder containing the template.
3. Locate the desired template.
4. Click **View** in the Actions column.
The template preview will be displayed.
---
#### Create a Folder
1. Navigate to **CRM > Templates > Email Templates**.
2. Click **Create Folder**.
3. Enter the Folder Name.
4. Click **Save**.
The folder will be created successfully.
---
#### Create an Email Template
Email templates can be created inside an existing folder or a newly created folder.
1. Navigate to **Templates > Email Templates**.
2. Click **Add Email Template**.
The Email Template Editor will open.
3. Enter the template name.
4. Select the folder where the template will be saved. If the required folder does not exist, click **Add Folder**, create a new folder, and then select it for the template.
5. Enter the email subject.
6. Enter the email body content.
7. Configure any additional template settings as required.
8. Click **Save**.
The Email Template will be created successfully.
#### Configure Template Details
Enter the following information:
- Template Name
- Folder Name
- Subject
- Email Body
---
#### Customize the Email Body
The editor allows you to customize:
- Font Type
- Font Size
- Font Style
- Text Formatting
- Alignment
- Colors
- Lists
- Links
and other formatting options.
---
**Add Images:**
To insert an image:
1. Click the **Image** button in the editor toolbar.
**Insert by URL:**
1. Enter the image source URL.
2. Configure image width and height if required.
3. Save the image.
**Upload an Image:**
1. Select the Upload option.
2. Drag and drop the image or browse for the file.
3. Save the image.
---
**Preview Email Content**
While editing the email body:
1. Click **View**.
The email preview will be displayed.
---
#### Use Merge Fields
Merge Fields allow dynamic information to be inserted automatically when the email is sent.
Examples include:
- First Name
- Contact Name
- Contact Phone
- Contact Address
- Realtor Name
- Realtor Email
When inserted into a template, merge fields appear as placeholders such as:
`[[name]]`
The actual lead information will automatically replace the placeholder when the email is delivered.
Merge fields can be used in both:
- Subject Line
- Email Body
---
**Add Attachments:**
1. Click **Attachment**.
2. Drag and drop the desired file or browse for the file.
3. Upload the attachment.
The attachment will be included when the email is sent.
---
**Save the Template:**
After completing all required information:
1. Click **Save**.
The Email Template will be created successfully.
---
#### Edit an Email Template
1. Open the folder containing the template.
2. Locate the desired template.
3. Click **Edit**.
Make the required changes.
You can then, Update Existing Template
Click **Update** to save changes to the current template.
#### Save As New Template
Click **Save As**.
Enter a new template name.
A new template will be created while preserving the original.
---
#### Delete an Email Template
1. Open the folder containing the template.
2. Locate the desired template.
3. Click **Delete**.
4. Confirm the deletion.
#### Important Note
Email Templates currently assigned to an Action Plan cannot be deleted.
You must first remove the template from the Action Plan before deleting it.
---
#### Copy an Email Template
1. Open the folder containing the template.
2. Locate the desired template.
3. Click **Copy Template**.
4. Select the destination folder.
5. Click **Copy**.
A duplicate of the template will be created in the selected folder.
The copied template will retain the original template name unless renamed later.
---
#### Move an Email Template
1. Open the folder containing the template.
2. Locate the desired template.
3. Click **Move Template**.
4. Select the destination folder.
5. Click **Move**.
The template will be moved successfully.
---
#### Using Email Templates in Action Plans
Email Templates can be used while creating or editing Action Plans.
1. Navigate to **Automation > Action Plans**.
2. Create a new Action Plan or edit an existing Action Plan.
3. Click **Add Action**.
4. Select **Send Email** as the action type.
5. Choose the desired Email Template.
6. Configure the execution timing.
7. Click **Save** or **Update**.
The selected Email Template will be used when the Action Plan executes the email step.
**Note:** While selecting an Email Template, you can create a new template by clicking the **Plus (+)** button next to the template selection field.
If required, you can also create a new folder while creating the template and then select that folder for the new Email Template.
---
You have successfully learned how to manage Email Templates in AgentRoof CRM.
# SMS templates
#### What Are SMS Templates?
SMS Templates allow you to create reusable text message content that can be used throughout AgentRoof CRM.
They help save time by allowing you to create predefined SMS messages that can be used in Action Plans, manual SMS communication, and other automation features.
SMS Templates support customizable message content and merge fields for personalized communication.
---
#### Access SMS Templates
1. From the left-hand menu, select **Templates**.
2. Click **SMS Templates**.
3. The SMS Templates page will be displayed.
SMS Templates are organized into folders for easier management.
---
#### Understanding Template Folders
Templates are stored inside folders.
The system includes default folders created by AgentRoof.
#### System Folders
System-generated folders:
- Start with **AgentRoof**
- Cannot be edited
- Cannot be deleted
In addition to system folders, you can create your own folders to organize custom templates.
---
#### View SMS Templates
1. Navigate to **CRM > Templates > SMS Templates**.
2. Click the folder containing the template.
3. Locate the desired template.
4. Click **View** in the Actions column.
5. The template preview will be displayed.
---
#### Create a Folder
1. Navigate to **CRM > Templates > SMS Templates**.
2. Click **Create Folder**.
3. Enter the Folder Name.
4. Click **Save**.
The folder will be created successfully.
---
#### Create an SMS Template
SMS Templates can be created inside an existing folder or a newly created folder.
1. Navigate to **Templates > SMS Templates**.
2. Click **Add SMS Template**.
3. The SMS Template Editor will open.
##### Configure Template Details
Enter the following information:
- Template Name
- Folder Name
- SMS Message Content
---
##### Select a Folder
Choose the folder where the SMS Template will be stored.
If the required folder does not exist:
1. Click **Create Folder**.
2. Enter the Folder Name.
3. Click **Save**.
4. Select the newly created folder.
Folders help organize templates and simplify template management.
---
##### Create SMS Content
Enter the SMS message content in the template editor.
The message entered here will be used whenever the SMS Template is selected in communications or automated workflows.
---
##### Use Merge Fields
Merge Fields allow dynamic information to be inserted automatically when the SMS message is sent.
Examples include:
- First Name
- Contact Name
- Contact Address
- Contact Phone
- Realtor Name
- Realtor Email
- Realtor Phone
- City
When inserted into a template, merge fields appear as placeholders such as:
\[\[name\]\]
The actual lead information will automatically replace the placeholder when the SMS is delivered.
Merge fields can be inserted directly into the SMS message content.
---
##### Save the Template
After completing all required information:
1. Click **Add Text Template**.
The SMS Template will be created successfully and displayed in the selected folder.
---
#### View an SMS Template
1. Navigate to **CRM > Templates > SMS Templates**.
2. Open the folder containing the template.
3. Locate the desired template.
4. Click **View**.
The template preview will be displayed.
---
#### Edit an SMS Template
1. Open the folder containing the template.
2. Locate the desired template.
3. Click **Edit**.
4. Make the required changes.
The SMS Template will be updated successfully.
You can save your changes in two ways:
**Update**
Click **Update Text Template** to modify the existing template.
> **Note:** If the template was originally created by AgentRoof, selecting **Update Text Template** will transfer its ownership to the realtor.
**Save As**
Click **Save As** to create a separate copy of the template using a new name.
> **Note:** The original template will remain unchanged and retain its existing ownership, while the newly created template will be owned by the realtor.
##### Additional Information
> **Note**: Changes made to an SMS Template only affect future usage of the template. Previously sent SMS messages are not modified.
---
#### Delete an SMS Template
1. Open the folder containing the template.
2. Locate the desired template.
3. Click **Delete**.
4. Confirm the deletion.
The SMS Template will be removed successfully.
>
SMS Templates currently assigned to an Action Plan cannot be deleted.
>
>
You must first remove the template from the Action Plan before deleting it.
---
#### Copy an SMS Template
1. Open the folder containing the template.
2. Locate the desired template.
3. Click **Copy Template**.
4. Select the destination folder.
5. Click **Copy**.
A duplicate of the template will be created in the selected folder.
The copied template will retain the original template name unless renamed later.
> **Note:** The original template will remain unchanged and retain its existing ownership. The copied template will be created under the realtor's ownership and can be managed independently.
#### Move an SMS Template
1. Open the folder containing the template.
2. Locate the desired template.
3. Click **Move Template**.
4. Select the destination folder.
5. Click **Move**.
The template will be moved successfully.
> **Note:** The template will retain its existing content and configuration. If the template was originally created by AgentRoof, ownership will be transferred to the realtor after it is moved.
#### Using SMS Templates in Action Plans
SMS Templates can be used while creating or editing Action Plans.
1. Navigate to **Automation > Action Plans**.
2. Create a new Action Plan or edit an existing Action Plan.
3. Click **Add Action**.
4. Select **Send Text** as the action type.
5. Choose the desired SMS Template.
6. Configure the execution timing.
7. Click **Save** or **Update**.
The selected SMS Template will be used when the Action Plan executes the SMS step.
#### Add SMS Templates in Action Plans
SMS Templates can be created in an action plan
1. Create a new Action Plan or open an existing Action Plan.
2. Click **Add Action**.
3. Under **Action**, select **Send Text**.
4. In the **Template** section, click the **+** icon.
5. Enter the required SMS Template details.
6. Configure the template content as needed.
7. Once all required fields have been completed, save the template.
The newly created SMS Template will now be available for use within the Action Plan.
---
#### Conclusion
You have successfully learned how to manage SMS Templates in AgentRoof CRM.
# Brokerage
CRM Features of a brokerage user
# My Realtors
#### What Is a Brokerage?
A Brokerage account allows brokers to manage and collaborate with realtors within AgentRoof CRM.
Brokerages can manage their own leads, assign leads to realtors, and control how new leads are distributed among realtors.
The My Realtors section allows brokerages to add realtors, manage realtor relationships, configure lead transfer settings, and monitor assigned leads.
---
#### Access My Realtors
1. Log in to your Brokerage account.
2. From the left-hand menu, click **My Realtors**.
The My Realtors page displays all realtors associated with the brokerage.
From this page, you can view:
- Realtor Name
- Email Address
- Website
- Assigned Leads
- Source
- Available Actions
---
#### Add a Realtor
1. Navigate to **My Realtors**.
2. Click **Add Realtor**.
3. Select one or more realtors.
4. Click **Submit**.
An invitation will be sent to the selected realtor(s).
#### Invitation Status
After the invitation is sent, the Actions column will display **Request Sent**.
Once the realtor accepts the invitation, their status becomes active and they will appear as an active realtor under the brokerage.
---
#### Configure Lead Transfer
Lead Transfer controls how new leads are assigned to realtors.
1. Navigate to **My Realtors**.
2. Click **Lead Transfer**.
You can choose one of the following options:
#### Manual Assignment
New leads are not assigned automatically.
The brokerage must manually assign leads to realtors.
#### Automatic Assignment
New leads are assigned automatically to realtors.
#### Round Robin Distribution
Round Robin distributes new leads evenly among active realtors.
For example:
3 realtors Realtor A, Realtor B & Realtor C are connected with the brokerage, then the leads 1 to 5 will be assigned as follows,
Lead 1 → Realtor A
Lead 2 → Realtor B
Lead 3 → Realtor C
Lead 4 → Realtor A
Lead 5 → Realtor B
This process continues in sequence to ensure fair lead distribution.
Click **Save** after selecting the desired lead transfer method.
---
#### Assign Sources to a Realtor
Sources can be assigned to realtors to automatically direct leads from selected sources to the assigned realtor.
1. Navigate to **My Realtors**.
2. Select the desired realtor.
3. Click **Assign Source**.
4. Select one or more sources.
5. Click **Apply**.
The selected sources will be assigned to the realtor successfully.
For example:
Realtor A & B got assigned to the source 'Website" and Realtor C got assigned with the source "Facebook". Assume that the leads are coming in the order such as Leads 1 & 2 from website, Lead 3 from Facebook, Lead 4, 5 & 6 from website, then the leads will distributed as follows
Lead 1 → Realtor A
Lead 2 → Realtor B
Lead 3 → Realtor C
Lead 4 → Realtor A
Lead 5 → Realtor B
Lead 6 → Realtor A
---
#### View Leads Assigned to a Realtor
1. Navigate to **My Realtors**.
2. Locate the desired realtor.
3. Click **View** in the Actions column.
The list of leads assigned to the selected realtor will be displayed.
---
#### Remove a Realtor
1. Navigate to **My Realtors**.
2. Locate the desired realtor.
3. Click **Delete** in the Actions column.
4. Confirm the deletion.
The realtor will be removed from the brokerage successfully.
---
You have successfully learned how to manage Realtors in AgentRoof CRM.
# My Brokerage
#### What is My Brokerage?
My Brokerage allows realtors to review and manage brokerage invitations sent to their account.
Through the My Brokerage page, realtors can:
- Review brokerage invitations
- View brokerage information
- Accept or reject brokerage requests
- Manage their brokerage association
- Exit an existing brokerage relationship
---
#### Access My Brokerage
1. Navigate to the left-hand menu.
2. Click **My Brokerage**.
The My Brokerage page will be displayed.
---
#### Review Brokerage Invitations
When a brokerage sends an invitation, it will appear on the My Brokerage page.
The invitation includes brokerage details such as:
- Brokerage Name
- Email Address
- Phone Number
- Website
Review the information carefully before deciding whether to accept or reject the invitation.
---
#### Accept a Brokerage Invitation
1. Open the **My Brokerage** page.
2. Review the brokerage details.
3. Click **Accept**.
The brokerage request will be approved and your account will become associated with the selected brokerage.
Once accepted, the brokerage information will be displayed on the My Brokerage page.
> **Note**
>
> A realtor can only be associated with **one brokerage at a time**.
---
#### Reject a Brokerage Invitation
1. Open the **My Brokerage** page.
2. Review the brokerage details.
3. Click **Reject**.
The invitation will be declined and no brokerage association will be created.
---
#### View Brokerage Information
After accepting a brokerage invitation, the My Brokerage page displays the details of your associated brokerage.
Available information includes:
- Brokerage Name
- Email Address
- Phone Number
- Website
This information can be reviewed at any time from the My Brokerage page.
---
#### Exit a Brokerage
If you no longer wish to be associated with a brokerage:
1. Navigate to **My Brokerage**.
2. Click **Exit the Brokerage**.
3. Confirm the action if prompted.
The brokerage association will be removed successfully.
Once removed, you will no longer be connected to the brokerage and may choose to associate with a different brokerage in the future.
> **Note**
>
> Because a realtor can only be associated with one brokerage at a time, you must exit your current brokerage before joining another brokerage.
---
##### Conclusion
You have successfully learned how to use the My Brokerage feature in AgentRoof CRM, including reviewing brokerage invitations, accepting or rejecting requests, viewing brokerage information, and managing your brokerage association.
# Lead Sharing
#### What Is a Brokerage?
A brokerage account allows brokers to manage realtors and distribute leads among them.
Lead Sharing enables brokers to transfer leads from the brokerage account to connected realtors. Once transferred, the lead becomes available in the realtor's CRM while remaining visible to the brokerage.
---
#### Access Lead Sharing
1. Log in to your Brokerage account.
2. Navigate to **CRM** from the left-hand menu.
The CRM page displays all leads available to the brokerage.
From this page, you can view information such as:
- Lead Name
- Phone Number
- Email Address
- Activity
- Transfer Date
- Lead Status
- Assigned Realtor Information
- Additional Lead Details
Transferred leads display a label indicating the assigned realtor.
Example:
**Assigned To: Realtor Name**
---
#### Lead Tabs
The CRM page contains two tabs:
#### All Leads
Displays all leads within the brokerage account, including leads that have been transferred to realtors.
#### My Leads
Displays only leads that currently belong to the brokerage and have not been transferred to a realtor.
---
#### Transfer Leads to a Realtor
1. Navigate to **CRM**.
2. Select one or more leads.
3. Click **More** from the top menu.
4. Click **Lead Transfer.**
5. Select the realtor who will receive the leads.
6. Click **Submit**.
The selected leads will be transferred successfully.
#### Important Note
Only realtors who have accepted the invitation from the **My Realtors** page can receive transferred leads.
---
#### Transferred Lead Identification
After a lead is transferred:
- The lead remains visible within the brokerage CRM.
- The lead displays a label showing the assigned realtor.
Example:
**Assigned To: Realtor Name**
This allows brokers to easily identify which realtor is responsible for the lead.
---
#### Lead Visibility in the Realtor Account
When a lead is transferred:
1. The lead is automatically added to the realtor's CRM.
2. The realtor can manage the lead like any other assigned lead.
3. The lead displays a label indicating the brokerage that assigned it.
Example:
**Assigned By: Brokerage Name**
This helps the realtor identify where the lead originated.
---
You have successfully learned how to manage Lead Sharing in AgentRoof CRM.
# Action Plan Sharing
#### What Is an Action Plan?
An Action Plan is an automated workflow that performs predefined actions for assigned leads over a specified period of time.
Action Plans help automate follow-up activities such as sending emails, sending SMS messages, adding tags, changing stages, creating notes, assigning other action plans, and more.
#### What Is a Brokerage?
A brokerage account allows brokers to manage realtors and share resources such as Action Plans with connected realtors.
Sharing Action Plans helps ensure that realtors can use brokerage-approved automation workflows without needing to recreate them manually.
---
#### Share an Action Plan
1. Log in to your Brokerage account.
2. From the left-hand menu, click **Automation**.
3. Select **Action Plans**.
4. Select the Action Plan you want to share.
5. Click **Share** from the top menu.
6. Select one or more realtors.
7. Click **Submit**.
The Action Plan will be shared successfully.
---
#### Important Notes
- Action Plans created by the Super Admin cannot be shared with realtors.
- Only brokerage-created Action Plans can be shared.
- Multiple realtors can be selected during the sharing process.
---
#### Shared Templates
When an Action Plan is shared, any templates associated with the Action Plan are automatically transferred to the realtor account.
This includes:
- Email Templates
- SMS Templates
The transferred templates will appear in the realtor's Templates section.
Templates shared from a brokerage are identified with the label:
**Created by Brokerage**
This allows realtors to distinguish brokerage-provided templates from their own templates.
---
You have successfully learned how to share Action Plans in AgentRoof CRM.
# Profile Settings
# Contact Details
# Signature
# Password Reset
#### What Is the Forgot Password Feature?
The Forgot Password feature allows users to reset their AgentRoof CRM password if they are unable to access their account.
A password reset link will be sent to the registered email address associated with the account, allowing the user to create a new password and regain access to AgentRoof CRM.
---
#### Reset Your Password
##### Access the Forgot Password Page
1. Navigate to the AgentRoof CRM login page.
2. Click **Forgot Password?**
The Forgot Password page will be displayed.
---
##### Request a Password Reset Link
1. Enter the email address associated with your AgentRoof CRM account.
2. Click **Submit**.
A confirmation message will be displayed indicating that a password reset link has been sent if the email address exists in the system.
---
##### Create a New Password
1. Open the email inbox associated with the registered email address.
2. Locate the password reset email.
3. Click the password reset link provided in the email.
4. Enter your new password.
5. Confirm the new password.
6. Submit the changes.
Your password will be updated successfully.
---
##### Sign In with the New Password
1. Return to the AgentRoof CRM login page.
2. Enter your registered email address.
3. Enter your newly created password.
4. Click **Login**.
You will be logged in to your AgentRoof CRM account successfully.
---
> **Notes**
>
> - The password reset email is only sent if the email address exists in AgentRoof CRM.
> - Ensure you enter the email address associated with your account.
> - If you do not receive the email, check your spam or junk folder.
> - Password reset links should be used promptly after they are received.
---
#### Conclusion
You have successfully learned how to reset your AgentRoof CRM password using the Forgot Password feature.
# Email Credits
#### What Are Email Credits?
Email Credits determine the number of emails that can be sent from your AgentRoof CRM account.
Each account is configured with a default monthly email credit allocation. If additional credits are required, they can be purchased separately.
Purchased email credits are valid for 30 days from the date of purchase.
---
#### View Email Credits
1. Click your profile icon.
2. Select **Email Credits**.
The Email Credits page will be displayed.
##### From this page, you can view:
- Available Email Credits
- Monthly Credit Allocation
- Credit Usage
- Additional Credit Purchase Options
- Purchase History
The Purchase History section displays all previously purchased email credit plans.
---
#### Purchase Additional Email Credits
1. Navigate to **Profile > Email Credits**.
2. Click **Purchase Additional Credits**.
A list of available email credit plans will be displayed.
3. Locate the desired plan.
4. Click **Buy Now**.
A payment window will appear.
**Enter the required payment details:**
- Card Number
- Expiry Date
- Security Code
- Country
5. Click **Pay Now**.
The purchase will be processed successfully.
The purchased email credits will be added to your account immediately.
---
> **Note:**
>
> All purchased email credit plans have a validity period of 30 days from the purchase date.
>
> Any unused purchased credits will expire after the validity period ends.
---
##### Credit Usage Priority
If a new monthly email credit allocation is added while purchased credits are still available, the purchased credits will continue to be used before the monthly allocated credits.
Once the purchased credits are fully used or expire, the system will begin using the monthly allocated credits.
---
##### Conclusion
You have successfully learned how to manage Email Credits in AgentRoof CRM.
# SMS Credits
#### What Are SMS Credits?
SMS Credits determine the number of text messages that can be sent from your AgentRoof CRM account.
Each account is configured with a default monthly SMS credit allocation. If additional credits are required, they can be purchased separately.
Purchased SMS credits are valid for 30 days from the date of purchase.
---
#### View SMS Credits
1. Click your profile icon.
2. Select **SMS Credits**.
The SMS Credits page will be displayed.
From this page, you can view:
- Available SMS Credits
- Monthly Credit Allocation
- Credit Usage
- Additional Credit Purchase Options
- Purchase History
The Purchase History section displays all previously purchased SMS credit plans.
---
#### Purchase Additional SMS Credits
1. Navigate to **Profile > SMS Credits**.
2. Click **Purchase Additional Credits**.
A list of available SMS credit plans will be displayed.
3. Locate the desired plan.
4. Click **Buy Now**.
A payment window will appear.
5. Enter the required payment details:
- Card Number
- Expiry Date
- Security Code
- Country
6. Click **Pay Now**.
The purchase will be processed successfully.
The purchased SMS credits will be added to your account immediately.
---
#### SMS Credit Validity
All purchased SMS credit plans have a validity period of **30 days** from the purchase date.
Any unused purchased credits will expire after the validity period ends.
---
#### Credit Usage Priority
If a new monthly SMS credit allocation is added while purchased credits are still available, the purchased credits will continue to be used before the monthly allocated credits.
Once the purchased credits are fully used or expire, the system will begin using the monthly allocated credits.
---
You have successfully learned how to manage SMS Credits in AgentRoof CRM.
# Sending Emails & SMS from the CRM
# How to Send the Emails?
#### What Is the Send Email Feature?
The Send Email feature allows you to send emails directly to leads from multiple locations within AgentRoof CRM.
Emails can be sent using existing email templates or by modifying the content before sending. You can also choose a signature before sending the email.
Send Email is available from:
- CRM Page
- Lead Profile
- User Profile Email Section
- Inbox
---
#### Send Email from the CRM Page
1. Navigate to **CRM**.
2. Select one or more leads.
3. Click **Email** from the top menu.
A compose email window will appear.
4. Either you can type the message manually or select an existing email template
You can:
- Search for a template.
- Browse available templates.
5. Click **OK**.
The selected template content will be loaded.
6. Select the desired email signature.
By default, your default signature will be selected automatically.
You may choose a different signature if required.
7. Review or modify the email content.
8. Click **Send**.
The email will be sent successfully.
---
#### Send Email from a Lead Profile
1. Navigate to **CRM**.
2. Open the desired lead profile.
3. Click The **Plus** button from the bottom right.
4. Select **Send Email**.
The email editor will appear.
5. Enter or modify the email details.
You can:
- Change the subject.
- Modify the email body.
- Select a template.
- Select a signature.
6. Click **Send**.
The email will be sent successfully.
---
#### Send Email from the User Profile
1. Open your profile.
2. Locate the Email Ids
3. Click on the Send Email Icon against an Email Id
The email compose window will appear.
4. Enter or modify the email details.
5. Review the content.
6. Click **Send**.
The email will be sent successfully.
---
#### Inbox Overview
The Inbox allows you to view and manage:
- Sent emails
- Received emails
- Sent SMS messages
- Received SMS messages
All communication history with leads can be viewed from the Inbox.
---
#### Send Email from Inbox
The Inbox allows you to send new emails to leads, compose emails for specific leads, and reply to existing email conversations.
#### Send a New Email
1. Navigate to **Inbox**.
2. Click **Send New Email** from the top menu.
3. Select the lead you want to email.
4. Enter or modify the required email details.
5. Click **Send**.
The email will be sent successfully.
---
#### Send Email from a Specific Conversation
1. Navigate to **Inbox**.
2. Click on the **Email** tab (by default, the email tab will be selected)
3. Locate the lead you want to email (click on the conversation)
4. Click **Compose (**on the top of the conversation details at the right side**)**
5. The email editor will open for the selected lead.
6. Enter or modify the email content.
7. Click **Send**.
The email will be sent successfully.
---
#### Reply to an Email
1. Click Email Tab
2. Select **Inbox** from the dropdown menu.
3. Locate the lead you want to email.
4. Click on the **reply button of the respective email**.
5. The email editor will open for the selected email.
6. Enter or modify the email content.
7. Click **Send**.
The reply will be sent successfully.
---
#### Reply to an Email from the profile
1. Open a lead detail page
2. Click on the timeline
3. Select the Email Activity Section
4. Click on the reply icon on the email you want to reply
5. The email editor will open for the selected email.
6. Enter or modify the email content.
7. Click **Send**.
---
#### Email Templates While Sending Emails
When composing an email from any available location, you can:
1. Select an Email Template.
2. Search for the desired template if needed.
3. Load the template content.
4. Modify the subject or body if required.
5. Send the email.
This allows quick communication while maintaining consistent messaging.
---
You have successfully learned how to send emails in AgentRoof CRM.
# How to Send the SMS?
#### What Is SMS Messaging?
SMS Messaging allows you to communicate directly with leads from multiple areas within AgentRoof CRM.
You can send personalized text messages, use SMS templates, and insert merge fields to streamline lead communication and follow-up activities.
AgentRoof CRM provides multiple ways to send SMS messages, allowing you to choose the workflow that best suits your needs.
Before sending an SMS message, ensure that:
- The lead has a valid phone number.
- Sufficient SMS credits are available in your account.
- SMS templates have been created if you intend to use them.
- Merge fields are configured as needed for personalization.
---
#### Method 1: Send SMS from the CRM Page
##### Access the CRM Page
1. Navigate to **CRM**.
2. Select the checkbox next to the desired lead or leads.
3. Click **Send SMS** from the action bar.
The SMS composer will open.
**Compose the Message**
1. Enter the SMS content.
2. Optionally use:
- SMS Templates
- Merge Fields
##### Send the SMS
1. Review the message.
2. Click **Send**.
The SMS will be sent successfully to the selected lead or leads.
#### Method 2: Send SMS from a Lead Record
##### Open a Lead Record
1. Navigate to **CRM**.
2. Click the desired lead's name.
The lead record will open.
**Open the SMS Composer**
1. Click the **+** icon in the bottom-right corner.
2. Click the **SMS** icon.
The SMS composer will open.
**Compose the Message**
1. Enter the SMS content.
2. Optionally use:
- SMS Templates
- Merge Fields
##### Send the SMS
1. Review the message.
2. Click **Send**.
The SMS will be sent successfully to the selected lead.
---
#### Method 3: Send SMS from the Lead Profile
**Open the Lead Profile**
1. Navigate to **CRM**.
2. Open the desired lead record.
3. Click the **Profile** tab.
**Locate the Phone Number**
1. Scroll down to the **Phone Numbers** section.
2. Click the **SMS** icon next to the desired phone number.
The SMS composer will open.
**Compose the Message**
1. Enter the SMS content.
2. Optionally use:
- SMS Templates
- Merge Fields
**Send the SMS**
1. Review the message.
2. Click **Send**.
The SMS will be sent successfully to the selected lead.
#### Method 4: Send SMS from the Inbox
##### Access the Inbox
1. Click **Inbox** from the top navigation bar.
2. Click **Send New SMS**.
The Smart SMS composer will open.
**Compose the Message**
1. Click the **+** icon.
2. Search for and select the lead you want to message.
3. Enter your SMS content.
Optional features:
- Select an SMS Template.
- Insert Merge Fields.
##### Send the SMS
1. Review the message.
2. Click **Send**.
The SMS will be sent successfully to the selected lead.
#### Send an SMS to an Existing Lead Conversation
You can also send SMS messages directly within an existing lead conversation from the Inbox.
##### Steps
1. Navigate to **Inbox**.
2. Click the **SMS** tab.
3. Locate and open the desired lead conversation.
You can send an SMS in two different ways.
**Method 1: Send an SMS Using the Send SMS Button**
1. Click **Send SMS**.
2. Compose your message.
3. Optional:
- Select an **SMS Template**.
- Insert **Merge Fields** to personalize the message.
4. Click **Send**.
**Method 2: Send an SMS Directly from the Conversation**
1. Locate the **Enter Message** field at the bottom of the conversation.
2. Type your message.
3. Click the **Send** icon.
The SMS will be sent successfully to the selected lead and will appear within the conversation history.
---
#### SMS Personalization Features
While composing an SMS message, you can use additional tools to personalize and review your message before sending it.
##### Preview
The Preview feature allows you to review the final SMS before sending it to the recipient.
1. Click the **Preview** (Eye) icon while composing the message.
2. Review the recipient information and message content.
3. Close the preview window to return to the composer, or continue editing if needed.
Using Preview helps you verify the message before it is sent.
##### SMS Templates
SMS Templates allow you to insert preconfigured message content into your SMS.
##### Merge Fields
Merge Fields allow you to insert dynamic lead information into the message automatically.
Examples include:
- Lead Name
- Email Address
- Phone Number
#### Conclusion
You have successfully learned the different ways to send SMS messages in AgentRoof CRM, including sending messages from the Inbox, CRM page, lead record, and lead profile.
# How to Send Bulk Emails?
#### What Is Bulk Email?
The Bulk Email feature allows you to send a single email to multiple leads at the same time.
Bulk emails help you communicate with multiple leads efficiently without sending individual emails one by one. They can be used to share updates, follow up with groups of leads, deliver important information, and maintain consistent communication across your contact database.
Bulk emails can be sent from:
- CRM Page
- Inbox
**Note:** When sending a bulk email, the system checks whether you have sufficient email credits available. If the number of recipients exceeds your available email credits, an error message will be displayed indicating that there are not enough credits to send the email. Additional email credits can be purchased from your Profile page if needed.
---
#### Send Bulk Emails from the CRM Page
1. Navigate to **CRM**.
2. Select the leads you want to email.
You may:
- Select individual leads.
- Click **Select All** to select all available leads.
- Use filters such as **Status**, **Source**, **Tags**, **Stages**, and other available filters to locate specific groups of leads.
3. Click **Email** from the top menu.
The email composer window will appear.
4. Enter or modify the email details.
You can:
- Select an Email Template.
- Choose an Email Signature.
- Insert Merge Fields to personalize the email.
- Modify the email subject.
- Modify the email body.
5. Review the email content.
6. Click **Send**.
The email will be sent successfully to all selected leads.
---
#### Send Bulk Emails from Inbox
1. Navigate to **Inbox**.
2. Click **Send New Email**.
The compose email window will appear.
3. Select the leads you want to email.
4. Enter or modify the email details.
You can:
- Select an Email Template.
- Choose an Email Signature.
- Insert Merge Fields to personalize the email.
- Modify the email subject.
- Modify the email body.
5. Review the email content.
6. Click **Send**.
The email will be sent successfully to all selected leads.
---
#### Email Templates While Sending Bulk Emails
While composing a bulk email, you can select an existing Email Template.
1. Click **Select Template**.
2. Choose the desired template.
The template content will automatically populate the email editor.
You may modify the subject or email body before sending.
---
#### Email Signatures While Sending Bulk Emails
While composing a bulk email, you can select an email signature.
By default, your default signature will be selected automatically.
You may choose a different signature if required.
The selected signature will be included in the email before sending.
---
#### Merge Fields While Sending Bulk Emails
While composing a bulk email, you can insert Merge Fields into the subject or email body.
Merge Fields automatically replace placeholders with the corresponding lead information when the email is sent, helping personalize each email for the recipient.
---
You have successfully learned how to send bulk emails in AgentRoof CRM.
# How to Send Bulk SMS?
Bulk SMS allows you to send a single SMS message to multiple leads at the same time, helping you communicate efficiently with groups of leads within AgentRoof CRM.
There are two ways to send bulk SMS in AgentRoof CRM.
#### Method 1: Send Bulk SMS from the CRM Page
**Steps**
1. Navigate to the **CRM** page.
2. Select the leads you want to message.
3. You can send a bulk SMS by:
- selecting all leads,
- selecting filtered leads,
- or selecting specific leads using the checkboxes.
4. Click the **SMS** button.
5. Compose your SMS message.
6. If needed, use templates and merge fields to personalize the message.
7. Click **Send** to send the SMS to the selected leads.
#### Method 2: Send Bulk SMS from the Inbox Page
**Steps**
1. Navigate to the **Inbox** page.
2. Click the **Send New SMS** button.
3. Click the **+** button to add recipients.
4. Select the leads you want to include in the bulk SMS.
5. Click **Select** to confirm your lead selection.
6. Compose your SMS message.
7. If needed, use templates and merge fields to quickly create and personalize the message.
8. Click **Send** to send the SMS to the selected leads.
> **Note**
>
> - Ensure that sufficient SMS credits are available before sending a bulk SMS campaign. If there are not enough credits available, the SMS messages will not be sent.
> - If additional credits are required, you must purchase more SMS credits before sending the campaign
> - Ensure the selected leads have valid phone numbers before sending the message.
#### Result
The bulk SMS will be sent to all selected leads, allowing you to communicate with multiple recipients efficiently from a single message.
# How to Schedule Emails & SMS?
AgentRoof CRM allows you to schedule SMS messages and emails to be sent at a later date and time. Scheduled communications help you plan outreach in advance and ensure messages are delivered at the appropriate time.
You can also view and manage all scheduled communications from the Scheduled section within the Inbox page.
There are two ways to schedule communications in AgentRoof CRM.
#### Schedule an SMS
**Steps**
1. Open an **SMS composer** from any location in AgentRoof CRM where SMS messages can be created, such as Inbox, CRM, or a lead record.
2. Select the lead(s) you want to message.
3. Compose your SMS message.
4. You can either create the message manually or use a pre-built template.
5. Click the **Schedule** (clock) icon.
6. Select the desired date and time.
7. Confirm the schedule.
##### View and Manage Scheduled SMS
1. Navigate to the **Inbox** box.
2. Click the **Scheduled** tab.
3. Locate the scheduled SMS.
4. From here, you can:
- **Send Now**
- **Edit**
- **Reschedule**
- **Delete**
---
#### Schedule an Email
**Steps**
1. Open an **Email composer** from any location in AgentRoof CRM where SMS messages can be created, such as Inbox, CRM, or a lead record.
2. Select the lead(s) you want to email.
3. Enter the subject and compose your email.
4. You can either create the email manually or use a pre-built template.
5. Click the **Schedule** (clock) icon.
6. Select the desired date and time.
7. Confirm the schedule.
##### View and Manage Scheduled Emails
1. Navigate to the **Inbox** box.
2. Click the **Scheduled** tab.
3. Locate the scheduled email.
4. From here, you can:
- **Send Now**
- **Edit**
- **Reschedule**
- **Delete**
> Note
>
> - Scheduled communications remain available in the **Scheduled** tab until they are sent or deleted.
#### Result
The SMS or email will be scheduled for the selected date and time. You can manage scheduled communications until they are sent or deleted.
# Email and SMS Reports
#### What Are Email and SMS Reports?
Email and SMS Reports provide a centralized view of all communication activities performed within AgentRoof CRM.
These reports help you monitor message delivery, track recipient engagement, and identify potential delivery issues.
By reviewing these reports, you can better understand how your email and SMS campaigns are performing and take appropriate actions when needed.
---
#### Access Reports
1. Navigate to **Reports** from the left-hand menu.
The Reports page will be displayed.
From here, you can access both:
- Email Reports
- SMS Reports
---
#### Email Reports
**Access Email Reports**
1. Navigate to **Reports**.
2. Click **Email Reports**.
The Email Reports page will be displayed.
This page provides detailed information about email delivery status, recipient engagement, and email performance.
##### Email Report Fields
**Subject**
Displays the subject line of the email that was sent.
**Date**
Displays the date and time when the email activity occurred.
**Recipients**
Displays the recipient who received the email.
**Delivered**
Indicates that the email has been successfully accepted by the recipient's mail server.
**Opened**
Indicates that the recipient opened the email with images enabled.
This event is recorded each time the email is viewed.
**Clicked**
Indicates that the recipient clicked a call-to-action link within the email.
This helps track recipient engagement.
**Skipped**
Indicates that the email was not sent because the recipient's email address was invalid or unsubscribed.
**Processed**
Indicates that the email was successfully sent from AgentRoof CRM, but no status update was received from the recipient's mail server.
**Dropped**
Indicates that the recipient's email provider blocked or filtered the email before it could be delivered.
This commonly occurs due to spam filtering policies.
**Deferred**
Indicates that the email could not be delivered immediately.
The system will continue attempting delivery for up to 72 hours.
**Bounced**
Indicates that the recipient's mail server permanently rejected the email.
**Spam Reported**
Indicates that the recipient marked the email as spam.
---
#### SMS Reports
**Access SMS Reports**
1. Navigate to **Reports**.
2. Click **SMS Reports**.
The SMS Reports page will be displayed.
This page provides information about SMS delivery activity and recipient details.
##### SMS Report Fields
**Content**
Displays the content of the SMS message that was sent.
**Date**
Displays the date and time when the SMS was sent.
**Recipients**
Displays the number of leads selected to receive the email or SMS.
**Delivered**
Indicates that the SMS was successfully delivered to the recipient.
---
#### Benefits of Using Reports
Reports help you:
- Monitor communication activity
- Track recipient engagement
- Identify delivery issues
- Review message history
- Improve communication performance
---
#### Conclusion
You have successfully learned how to access and use Email Reports and SMS Reports in AgentRoof CRM.
# What is Inbox? How to Manage Emails & SMS from the Inbox?
#### What Is Inbox?
The Inbox provides a centralized location for managing all email and SMS communications with leads.
From the Inbox, you can:
- View incoming emails and SMS messages from leads.
- View sent emails and SMS messages.
- View scheduled emails and SMS messages.
- Review complete communication history with leads.
- Send new emails and SMS messages.
- Reply to existing email conversations.
- Continue SMS conversations with leads.
---
#### Access Inbox
1. Click **Inbox** from the top menu.
The Inbox page will be displayed.
---
#### Inbox Tabs
The Inbox contains two tabs:
#### Email
Displays all email communications with leads.
#### SMS
Displays all SMS communications with leads.
Select the desired tab to view the corresponding communication history.
---
#### Send a New Email
1. Navigate to **Inbox**.
2. Click **Send New Email**.
The compose email window will appear.
3. Select one or more leads.
4. Enter the email details.
5. Specify the email content.
6. Click **Send**.
The email will be sent successfully.
---
#### Send a New SMS
1. Navigate to **Inbox**.
2. Click **Send New SMS**.
The compose SMS window will appear.
3. Select one or more leads.
4. Enter the SMS message.
5. Click **Send**.
The SMS will be sent successfully.
---
#### View Inbox, Sent, and Scheduled Communications
Both Email and SMS tabs allow you to view communications based on their status.
Available views include:
- Inbox
- Sent
- Scheduled
To change the view:
1. Click the dropdown menu.
2. Select the desired option.
#### Inbox
Displays communications received from leads.
#### Sent
Displays communications sent by the realtor.
#### Scheduled
Displays communications that are scheduled to be sent at a future date.
---
#### Send an Email to a Specific Lead
1. Navigate to the **Email** tab.
2. Locate and select the desired lead.
The complete email history for the selected lead will be displayed.
4. Click **Compose**.
5. Enter or modify the email content.
6. Click **Send**.
The email will be sent successfully to the selected lead.
---
#### Reply to an Email
1. Open the desired email conversation.
2. Locate the email received from the lead.
3. Click **Reply**.
4. Enter your response.
5. Click **Send**.
The reply will be sent successfully.
---
#### SMS Conversations
1. Navigate to the **SMS** tab.
2. Select a lead.
The complete SMS conversation history for the selected lead will be displayed.
#### Send a New SMS to a Specific Lead
1. Locate and select the desired lead.
2. Click **Compose.**
3. Enter the message content.
4. Click **Send**.
The SMS will be sent successfully.
#### Continue an Existing SMS Conversation
1. Select the message field at the bottom of the conversation.
2. Enter your message.
3. Press Enter or click Send.
The message will be delivered to the lead successfully.
---
You have successfully learned how to use Inbox in AgentRoof CRM.
# Tasks & Appointments in the CRM
# What is a Task? How to Manage Tasks in the CRM?
#### What Is a Task?
Tasks are used to schedule reminders for activities that need to be completed by the realtor.
They help ensure important lead-related actions such as follow-ups, calls, emails, open houses, thank-you messages, and other activities are completed on time.
Tasks can be created and managed from a lead profile or through the Profile tab.
---
#### Create a Task from a Lead Profile
1. Navigate to **CRM**.
2. Open the desired lead profile.
3. Click on the **Plus** button at the bottom right.
4. Select **Add Task**.
The Add Task window will appear.
5. Enter the task title.
6. Select the task type.
Available task types may include:
- Follow Up
- Call
- Email
- Open House
- Thank You
- Other available task types
7. Select the task date.
8. Select the task time.
##### Set a Reminder
You can configure a reminder for the task.
Examples include:
- 10 minutes before
- 30 minutes before
- 1 day before
- 1 week before
- 5 weeks before
The reminder will be triggered relative to the scheduled task date and time.
##### Repeat the Task
If the task should occur repeatedly, enable **Repeat Event**.
You can customize the repeat settings by selecting a recurrence pattern such as:
- Daily
- Weekly
- Monthly
- Yearly
You can also specify when the recurring task should end.
Available options include:
- Never End
- End after a specified number of occurrences
- End on a specific date
9. Click **Save**.
The task will be created successfully.
The task will also be displayed on the Calendar on the scheduled date.
---
#### Manage Tasks from a Lead Profile
1. Navigate to **CRM**.
2. Open the desired lead profile.
3. Scroll to the **Tasks** section.
The task status will indicate whether the task is **Pending** or **Completed**.
##### Create a Task from the Tasks Section
1. Click on the **Plus** button.
2. Enter the task title.
3. Select the task type.
4. Select the date and time.
5. Configure the reminder settings.
6. Configure the repeat settings if required.
7. Click **Save**.
The task will be created successfully.
##### Edit a Task
1. Locate the task you want to modify.
2. Click **Edit**.
3. Make the required changes.
4. Click **Save**.
The task will be updated successfully.
##### Delete a Task
1. Locate the task you want to remove.
2. Click **Delete**.
3. Confirm the deletion.
The task will be deleted successfully.
---
You have successfully learned how to create and manage tasks in AgentRoof CRM.
# What is an Appointment? How Manage Appointments in the CRM?
#### What Is an Appointment?
Appointments are used to schedule meetings, events, and other planned activities with leads.
They help realtors organize their schedule, keep track of upcoming engagements, and receive reminders for important meetings and events.
Appointments are managed from the lead profile.
---
#### View Appointments
1. Navigate to **CRM**.
2. Open the desired lead profile.
3. Scroll to the **Appointments** section.
The Appointments section displays all appointments associated with the lead.
---
#### Create an Appointment
1. Navigate to **CRM**.
2. Open the desired lead profile.
3. Scroll to the **Appointments** section.
4. Click The **Plus** button.
The Add Appointment window will appear.
5. Enter the appointment title.
6. Enter a description for the appointment.
7. Specify the appointment location.
8. Select the appointment date.
9. Select the start time.
10. Select the end time.
11. Configure the reminder settings.
12. Click **Save**.
The appointment will be created successfully.
The appointment will also be displayed on the Calendar on the scheduled date and time.
---
#### Edit an Appointment
1. Locate the appointment you want to modify.
2. Click **Edit**.
3. Make the required changes.
4. Click **Save**.
The appointment will be updated successfully.
---
#### Delete an Appointment
1. Locate the appointment you want to remove.
2. Click **Delete**.
3. Confirm the deletion.
The appointment will be deleted successfully.
---
You have successfully learned how to create and manage appointments in AgentRoof CRM.
# CRM Calendar - Manage Tasks & Appointments from the Calendar
#### What Is the Calendar?
The Calendar provides a centralized view of all scheduled tasks and appointments.
It allows you to create, view, and manage tasks and appointments based on their scheduled date and time.
---
#### Calendar Views
Navigate to **Calendar**.
The Calendar provides three viewing options:
- Month View
- Week View
- Day View
Day View displays tasks and appointments based on their scheduled time during a specific day.
Week View displays tasks and appointments scheduled throughout the week.
Month View displays all scheduled tasks and appointments within the selected month.
---
#### Create a Task
1. Click **Add Task**.
The Add Task window will appear.
2. Select the lead.
3. Enter the task title.
4. Select the task type.
5. Select the task date and time.
6. Configure the reminder settings.
7. Enable **Repeat Event** if required.
8. Select the repeat schedule, such as Daily, Weekly, Monthly, or Yearly.
9. Specify when the recurring task should end.
10. Click **Save**.
The task will be created successfully and displayed on the Calendar.
---
#### Create an Appointment
1. Click **Add Appointment**.
The Add Appointment window will appear.
2. Select the lead.
3. Enter the appointment title.
4. Enter a description.
5. Specify the location.
6. Select the appointment date.
7. Select the start time.
8. Select the end time.
9. Configure the reminder settings.
10. Click **Save**.
The appointment will be created successfully and displayed on the Calendar.
---
#### View Calendar Items
Locate the task or appointment using its scheduled date and time.
Click the task or appointment.
The details will be displayed.
You can view information such as:
- Title
- Description
- Date and Time
- Status
---
#### Manage Tasks
Open the desired task from the Calendar.
You can perform the following actions:
- Mark as Complete
- Edit
- Delete
##### Mark as Complete
Click **Mark as Complete**.
The task status will be updated to Completed.
**Note:** The **Mark as Complete** option is only available for overdue tasks. Tasks that have not yet reached their scheduled date and time cannot be marked as complete.
##### Edit a Task
Click **Edit**.
Make the required changes.
Click **Save**.
**Note:** If the date or time of an existing task is modified, the updated task will be treated as a new scheduled task and will appear on the Calendar based on the newly selected date and time.
##### Delete a Task
Click **Delete**.
Confirm the deletion.
The task will be removed successfully.
---
#### Manage Appointments
Open the desired appointment from the Calendar.
You can perform the following actions:
- Edit
- Delete
Appointments do not include a Mark as Complete option.
##### Edit an Appointment
Click **Edit**.
Make the required changes.
Click **Save**.
##### Delete an Appointment
Click **Delete**.
Confirm the deletion.
The appointment will be removed successfully.
---
You have successfully learned how to use the Calendar in AgentRoof CRM.
# Activities of a Lead
# Timeline
#### What Is the Timeline Page?
The Timeline page provides a centralized view of all activities, communications, and interactions associated with a specific lead.
It allows you to review lead engagement history and quickly perform common actions without leaving the lead record.
The Timeline page helps you monitor ongoing conversations, track lead activity, and manage follow-up tasks from a single location.
---
##### Access the Timeline Page
1. Navigate to **CRM**.
2. Locate the desired lead.
3. Click the lead's name.
The lead record will open in the Timeline page by default.
---
##### Timeline Activity Filters
The left side of the Timeline page contains activity filters that allow you to quickly organize and review lead interactions.
**All**
Displays all activities associated with the lead, including:
- SMS
- Email
- Notes
- Call Logs
- Web Activity
**SMS**
Displays only SMS conversations associated with the lead.
**Email**
Displays only email communications associated with the lead.
**Notes**
Displays notes that have been created for the lead.
**Call Log**
Displays call activities associated with the lead.
**Web Activity**
Displays website activities performed by the lead.
---
##### Quick Actions
The Timeline page also provides quick actions that allow you to perform common lead management tasks.
To access these options:
1. Click the **+** icon in the bottom-right corner.
The following actions are available.
**Add Task**
Create a new task associated with the lead.
**Add Action Plan**
Assign an Action Plan to the lead.
**Add Note**
Create a new note for the lead.
**Add Tag**
Assign one or more tags to the lead.
**Send Email**
Send an email directly to the lead.
**Send SMS from Smart Number**
Send an SMS message using your configured Smart Number.
---
#### Benefits of Using the Timeline Page
The Timeline page helps you:
- View all lead activities in one place
- Monitor communication history
- Track website interactions
- Organize lead notes
- Access lead management tools quickly
- Perform follow-up actions without leaving the lead record
---
####
# Lead Profile
#### What Is the Lead Profile?
The Lead Profile page provides a centralized view of all information associated with a specific lead.
It allows you to manage lead details, monitor alerts, action plans, task and appointments organize files
The Lead Profile helps you maintain a complete overview of your relationship with a lead and quickly access important information when needed.
---
#### Access the Lead Profile
1. Navigate to **CRM**.
2. Locate the desired lead.
3. Click the lead's name.
4. Click the **Profile** tab.
The Lead Profile page will be displayed.
---
##### Manage Contact Information
The top left section of the Lead Profile displays important lead information, including:
- Lead Name
- Phone Numbers
- Email Addresses
- Addresses
- Lead basic details
- Files
- Background city
##### Edit Lead Information
Most information within the Lead Profile can be edited directly from this page.
You can:
- Add or update tags
- Add, edit, or remove phone numbers
- Change the lead stage
- Add, edit, or remove email addresses
- Update various lead details throughout the profile
> **Note:** The lead source cannot be edited from the Lead Profile page.
---
##### Addresses
This section displays addresses associated with the lead.
You can review and manage address information from here.
---
#### Property Alert Sections
The Lead Profile allows you to manage various property-related alerts assigned to the lead.
**New Listing Alerts**
Displays all New Listing Alerts assigned to the lead.
**Neighbourhood Alerts**
Displays all Neighbourhood Alerts assigned to the lead.
**Open House Alerts**
Displays all Open House Alerts assigned to the lead.
**Price Drop Alerts**
Displays all Price Drop Alerts assigned to the lead.
---
---
#### Files
The Files section allows you to upload, view, and manage documents associated with the lead.
---
##### Background
The Background section allows you to store additional notes or information related to the lead.
---
##### City
Displays city information associated with the lead.
---
##### Action Plans
Displays all Action Plans currently assigned to the lead.
You can also monitor their status from this section.
---
##### Real Estate Newsletter
Displays newsletter subscriptions associated with the lead.
---
##### Market Updates
Displays market update subscriptions assigned to the lead.
---
##### Tasks
Displays tasks associated with the lead.
This helps you track pending activities and follow-ups.
---
##### Appointments
Displays appointments scheduled for the lead.
This section helps you manage upcoming meetings and events.
---
#### Delete a Lead
You can also delete a lead directly from the Lead Profile page.
1. Scroll down within the Lead Profile page.
2. Click **Delete Lead**.
3. Review the confirmation message.
4. Click **Yes** to confirm.
The lead will be removed from the active CRM records.
> **Note:** AgentRoof CRM uses a soft-delete process. If the same lead is recreated using the same primary contact information, previously associated information may be restored.
---
#### Benefits of Using the Lead Profile
The Lead Profile helps you:
- View all lead information in one place
- Edit and manage lead details
- Organize lead-related documents
- Monitor assigned alerts and automations
- Track appointments and tasks
- Manage communication and follow-ups
- Delete leads when necessary
- Maintain a complete history of lead activities
---
#### Conclusion
You have successfully learned how to access and navigate the Lead Profile page in AgentRoof CRM.
# Analytics
# WEB Activity
# Notes
#### What Are Notes?
Notes allow you to record important information, reminders, and updates associated with a lead.
They help you maintain a history of conversations, follow-up details, and other relevant information that can be referenced later.
Notes are stored within the lead record and can be viewed at any time.
---
#### View Notes
##### From the Timeline Page
1. Navigate to **CRM**.
2. Select the desired lead.
3. The lead record will open in the Timeline page.
4. Under **All**, locate the notes associated with the lead.
5. You can also click **Notes** from the activity filters to display only notes.
---
#### Create a Note
1. From the lead's Timeline page, click the **+** icon in the bottom-right corner.
2. Click **Add Note**.
3. A pop-up window will appear.
4. Enter the note content.
5. Click **Submit**.
The note will be created successfully.
---
#### Preview a Note
1. Navigate to the lead's Timeline page.
2. Locate the desired note.
3. Click the note.
The complete note preview will be displayed.
---
#### Benefits of Using Notes
Notes help you:
- Record important lead information
- Keep track of conversations and follow-ups
- Maintain a history of lead interactions
- Organize lead-related updates
- Share information across your team
---
#### Conclusion
You have successfully learned how to create, view, and preview notes in AgentRoof CRM.
You have successfully learned how to access and navigate the Timeline page in AgentRoof CRM.